On Bokeh
The first part of article - On Bokeh Character - is here. I plan to produce a part about bokeh size and a part with some of my pictures related to bokeh theme later. I also plan to add more illustrations. This is work in progress.
Table of Contents
- What is bokeh?
- On Bokeh Character
- Outdoor bokeh comparisons
- Somewhat innovative methods to get nice bokeh
- Effect of Electronic First Curtain Shutter (EFCS) on Bokeh
- External Links
What is bokeh?
Bokeh is a word which photographers use for an appearance of out of focus parts of the picture. Each bright element in scene that is out of focus contributes to overall appearance. Bokeh can be observed best on bright dots which are out of focus and surrounded by dark background. Basic shape of such highlights is a filled circle. There are some geometry rules that tell how big it will be. Those are generally known. So I will skip this part for now. What I find interesting is character of bokeh.
On Bokeh Character
What affects bokeh shape?
The character of bokeh is best observed on small light sources. This character is mainly given by optical construction of lens. Most of modern lenses have rounded aperture blades. Older straight aperture blades produced polygonal out of focus highlights (if aperture was slightly closed). While the aperture blades are rounded in current lenses they may still be slightly visible in some aperture settings. Sometimes a single blade is slightly misaligned and more visible than others. I have seen too often marketing claim "rounded aperture blades produce pleasing bokeh". But rounded aperture blades are not guarantee of pleasing bokeh.
So what else goes into a character of bokeh? Sometimes what would be a circular out of focus highlight in the center of the image has a lemon shape outside of center, gradually more near borders and edges. This is caused by mechanical vignetting because the optical path in the lens is too narrow. Resulting shape is often a intersection of two non-concentric circles, often described as "lemon shape" or "cat eye".
Distracting bokeh or not?
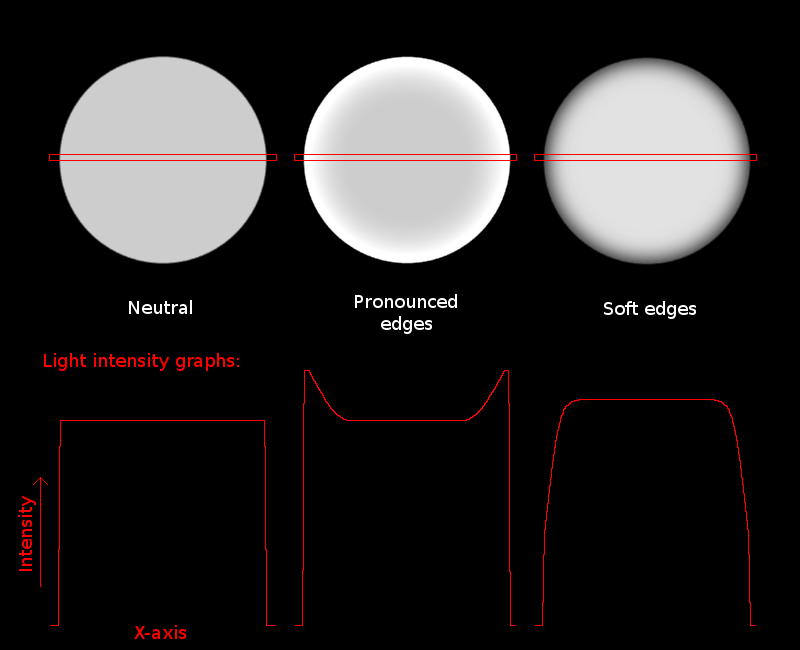
While shape of bokeh can be slightly distracting if it is not circular, there is another issue with out of focus highlights. It's a distribution of light inside of them. The differences in light density around edges of out of focus highlights have these basic types (red graphs show light intensity from the marked areas):
Why is there such light distribution?
Optimally corrected lenses focus all the entering rays from single point light source to a single point in image plane (at proper focus distance). Real lenses have various aberrations so what should be a point in image plane as produced by point light source is not a point, but rather some foggy ball. An aberration that causes light rays to be focused on different image planes depending on whether the ray goes through center of lens or sides is called spheric aberration.
Image below demonstrates spherical aberration. A lens being
simulated (by my custom tool) has two biconvex elements, both
with material with refraction index of 1.5. Both elements are
spherical so whole lens has spherical aberration with no
correction. Chromatic aberrations are not simulated. Light
rays are randomly colored so you can easily follow each
one.

Next image below uses white rays, but there are more of them to get better idea how this affects image plane.

Next image below uses 800 rays that can overlap to
approximate whole light field generated by that the single light
source in whole lens. Red vertical lines are sections of that
light field that show how would the light appear if image
sensor would be at that position - that is the bokeh.

Next two images show a different lens with two elements,
almost same as lens above, but with corrected spherical
aberration. Three surfaces of the two elements are same,
but one has been changed from a sphere to a slightly different
curve. Specifically, the equation for original spheric surface
was
x = 10*cos(alpha); y = 10*sin(alpha) while the new aspheric surface has this equation:
x = 10*cos(alpha)+13*alpha^4; y = 10*sin(alpha).

More detailed light field:

Next two images show another lens almost same as lens above,
but with overcorrected spherical aberration. Corrective part
of equation was multiplied by 1.3 so the corrective effect stronger than it should be.
Equation is x = 10*cos(alpha)+1.3*13*alpha^4; y = 10*sin(alpha).

More detailed light field shows the bokeh appearance is
reversed in lens with over-corrected spherical aberration in
comparison with the original lens which was completely
uncorrected:

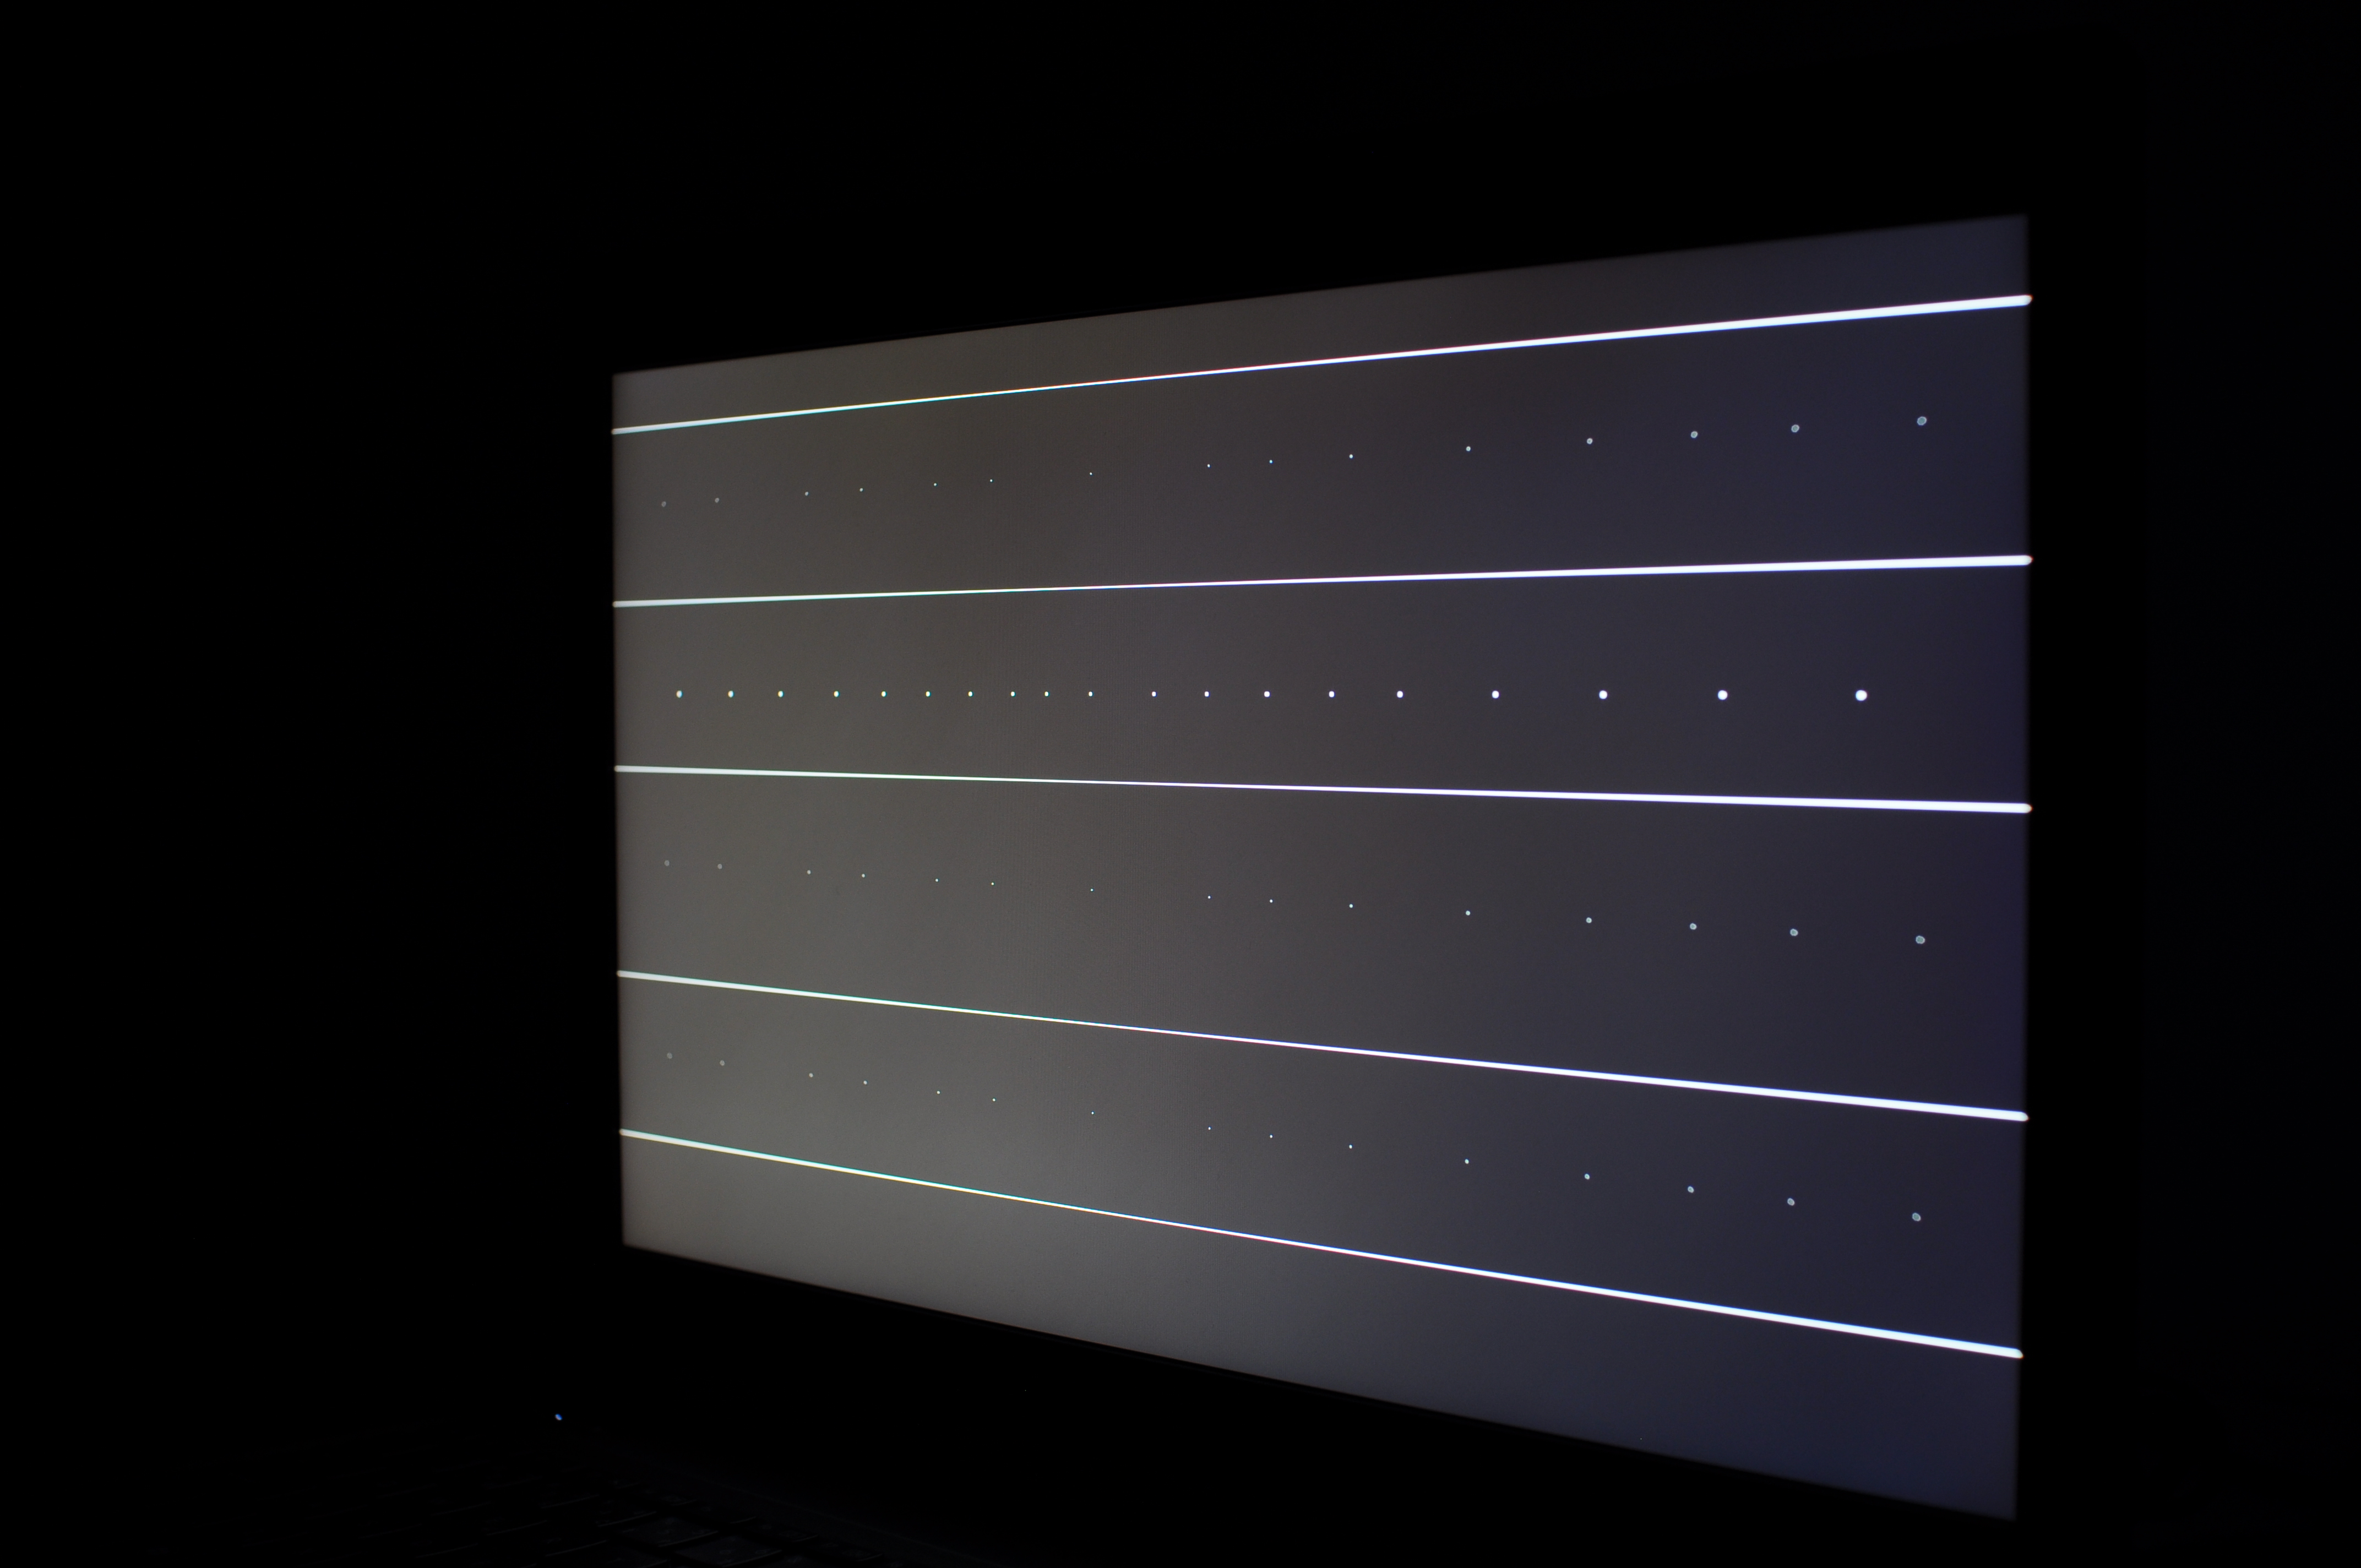
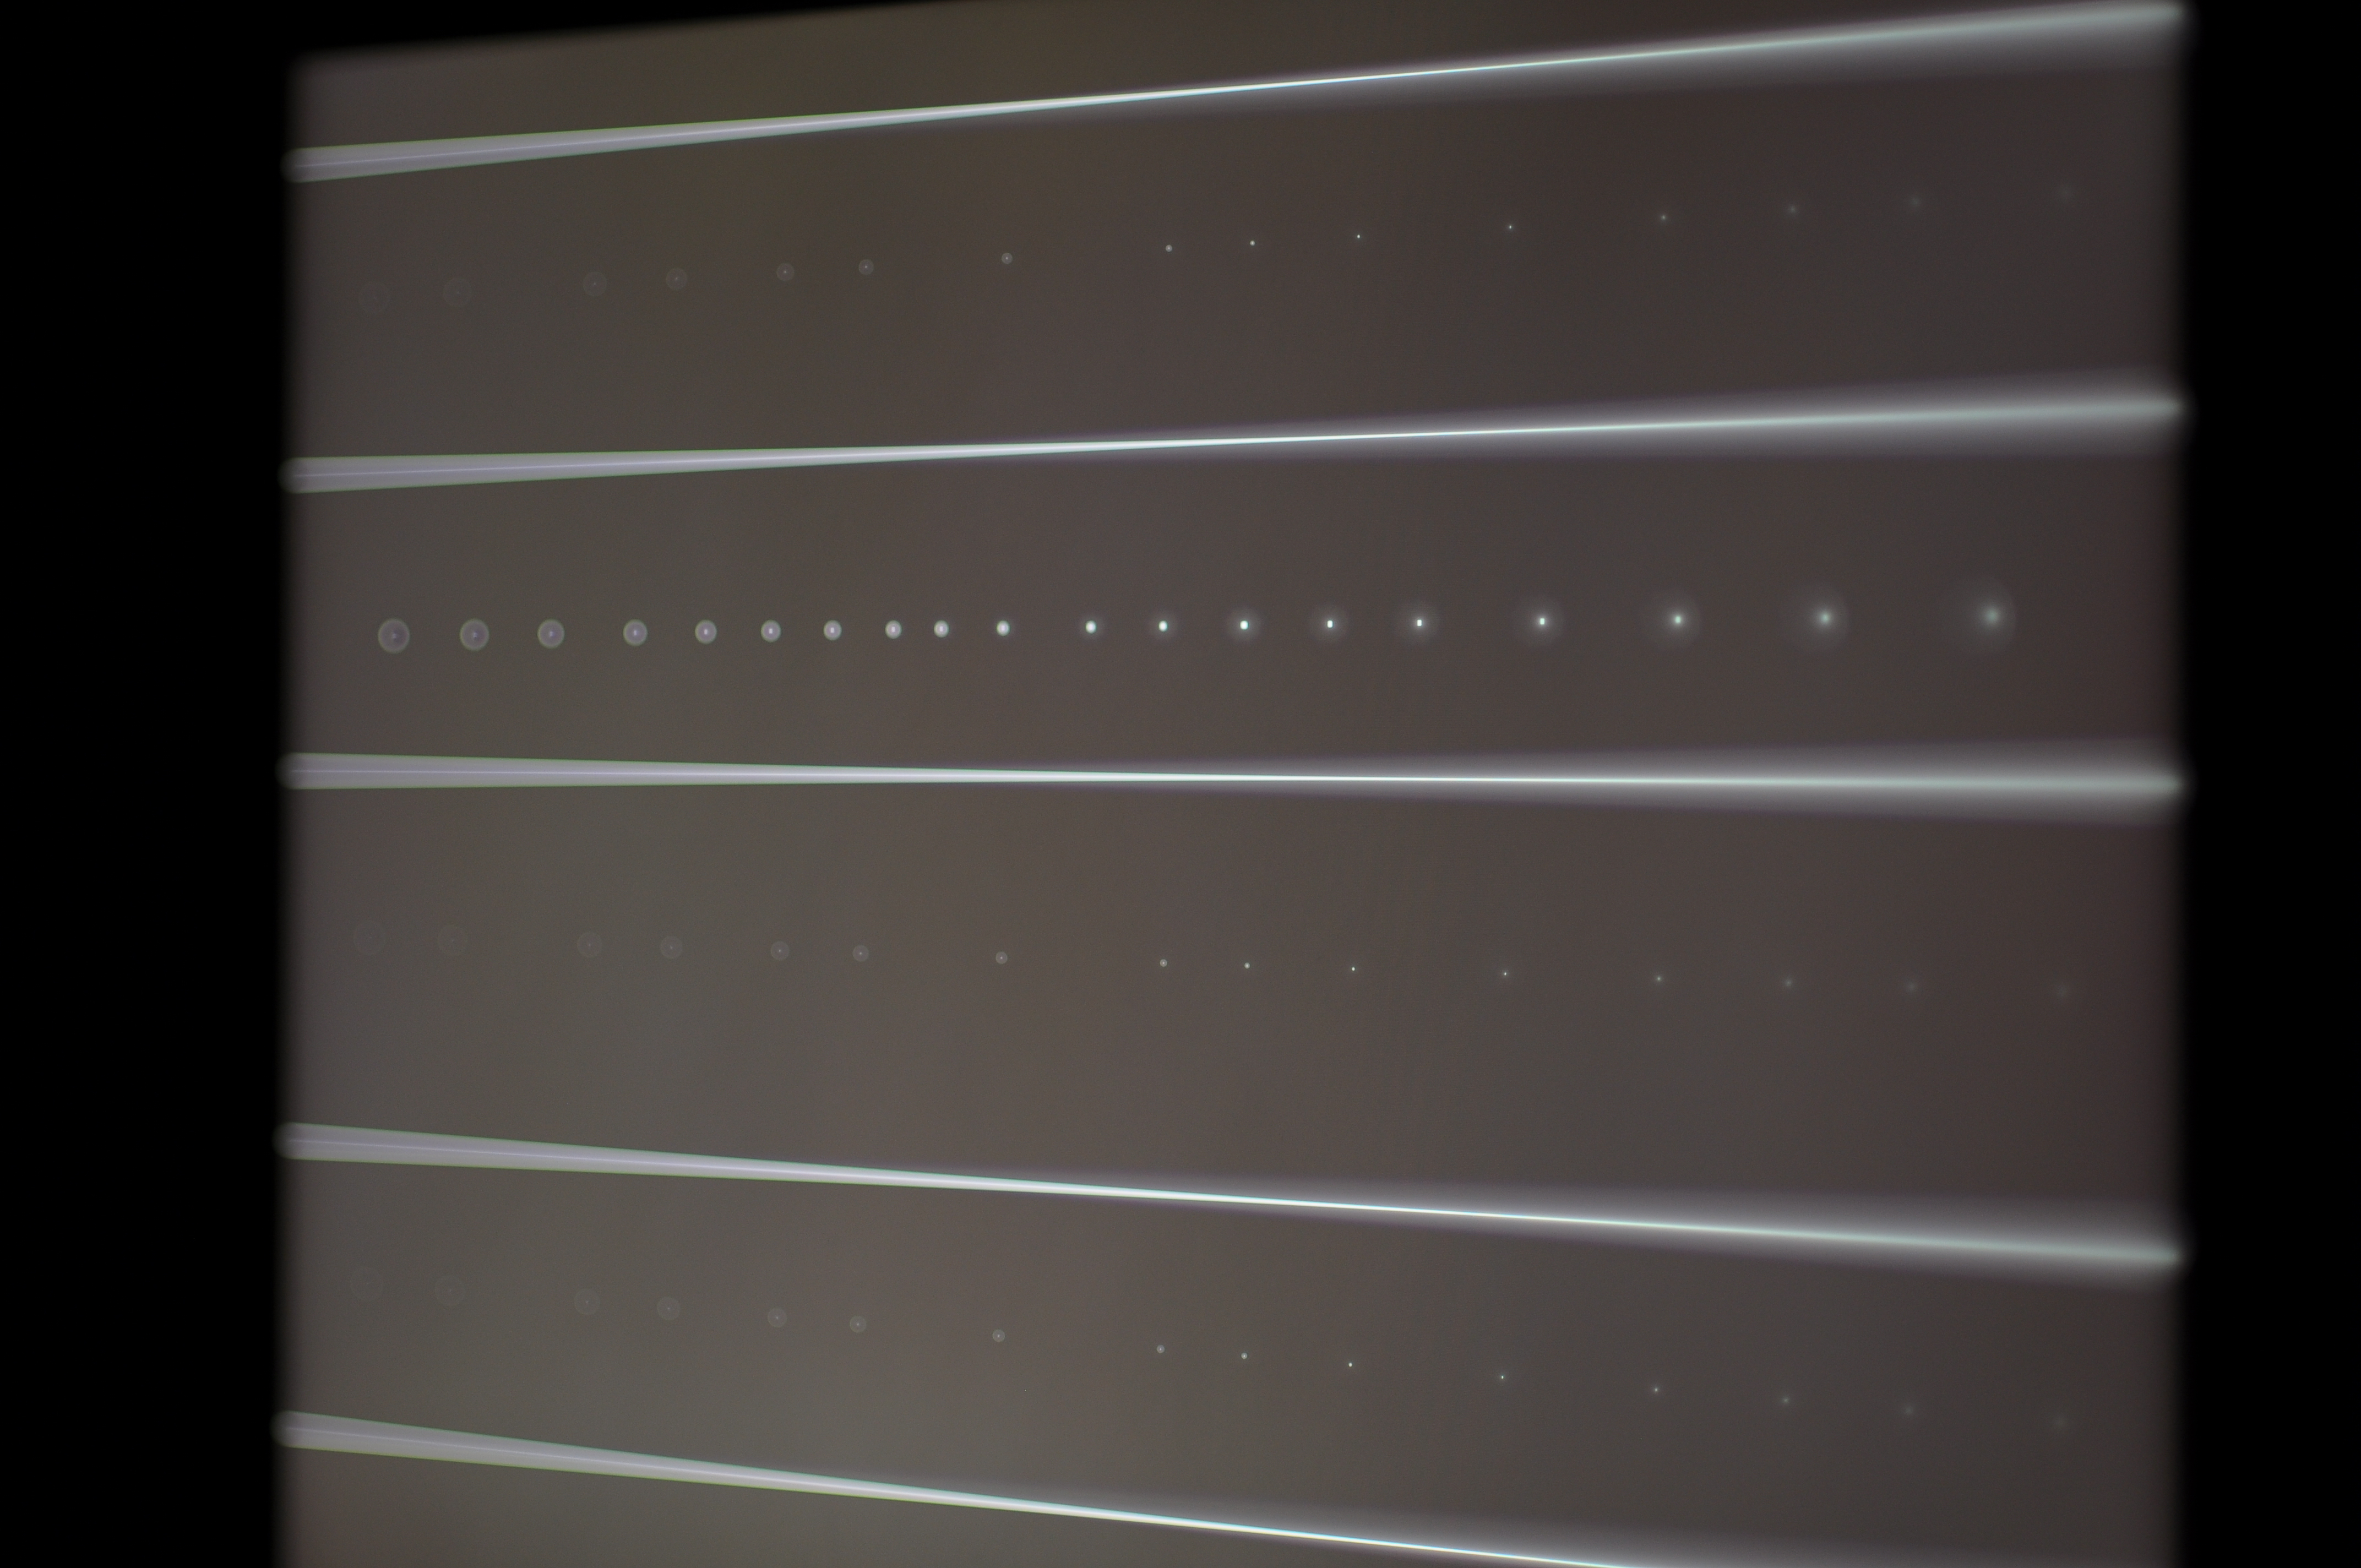
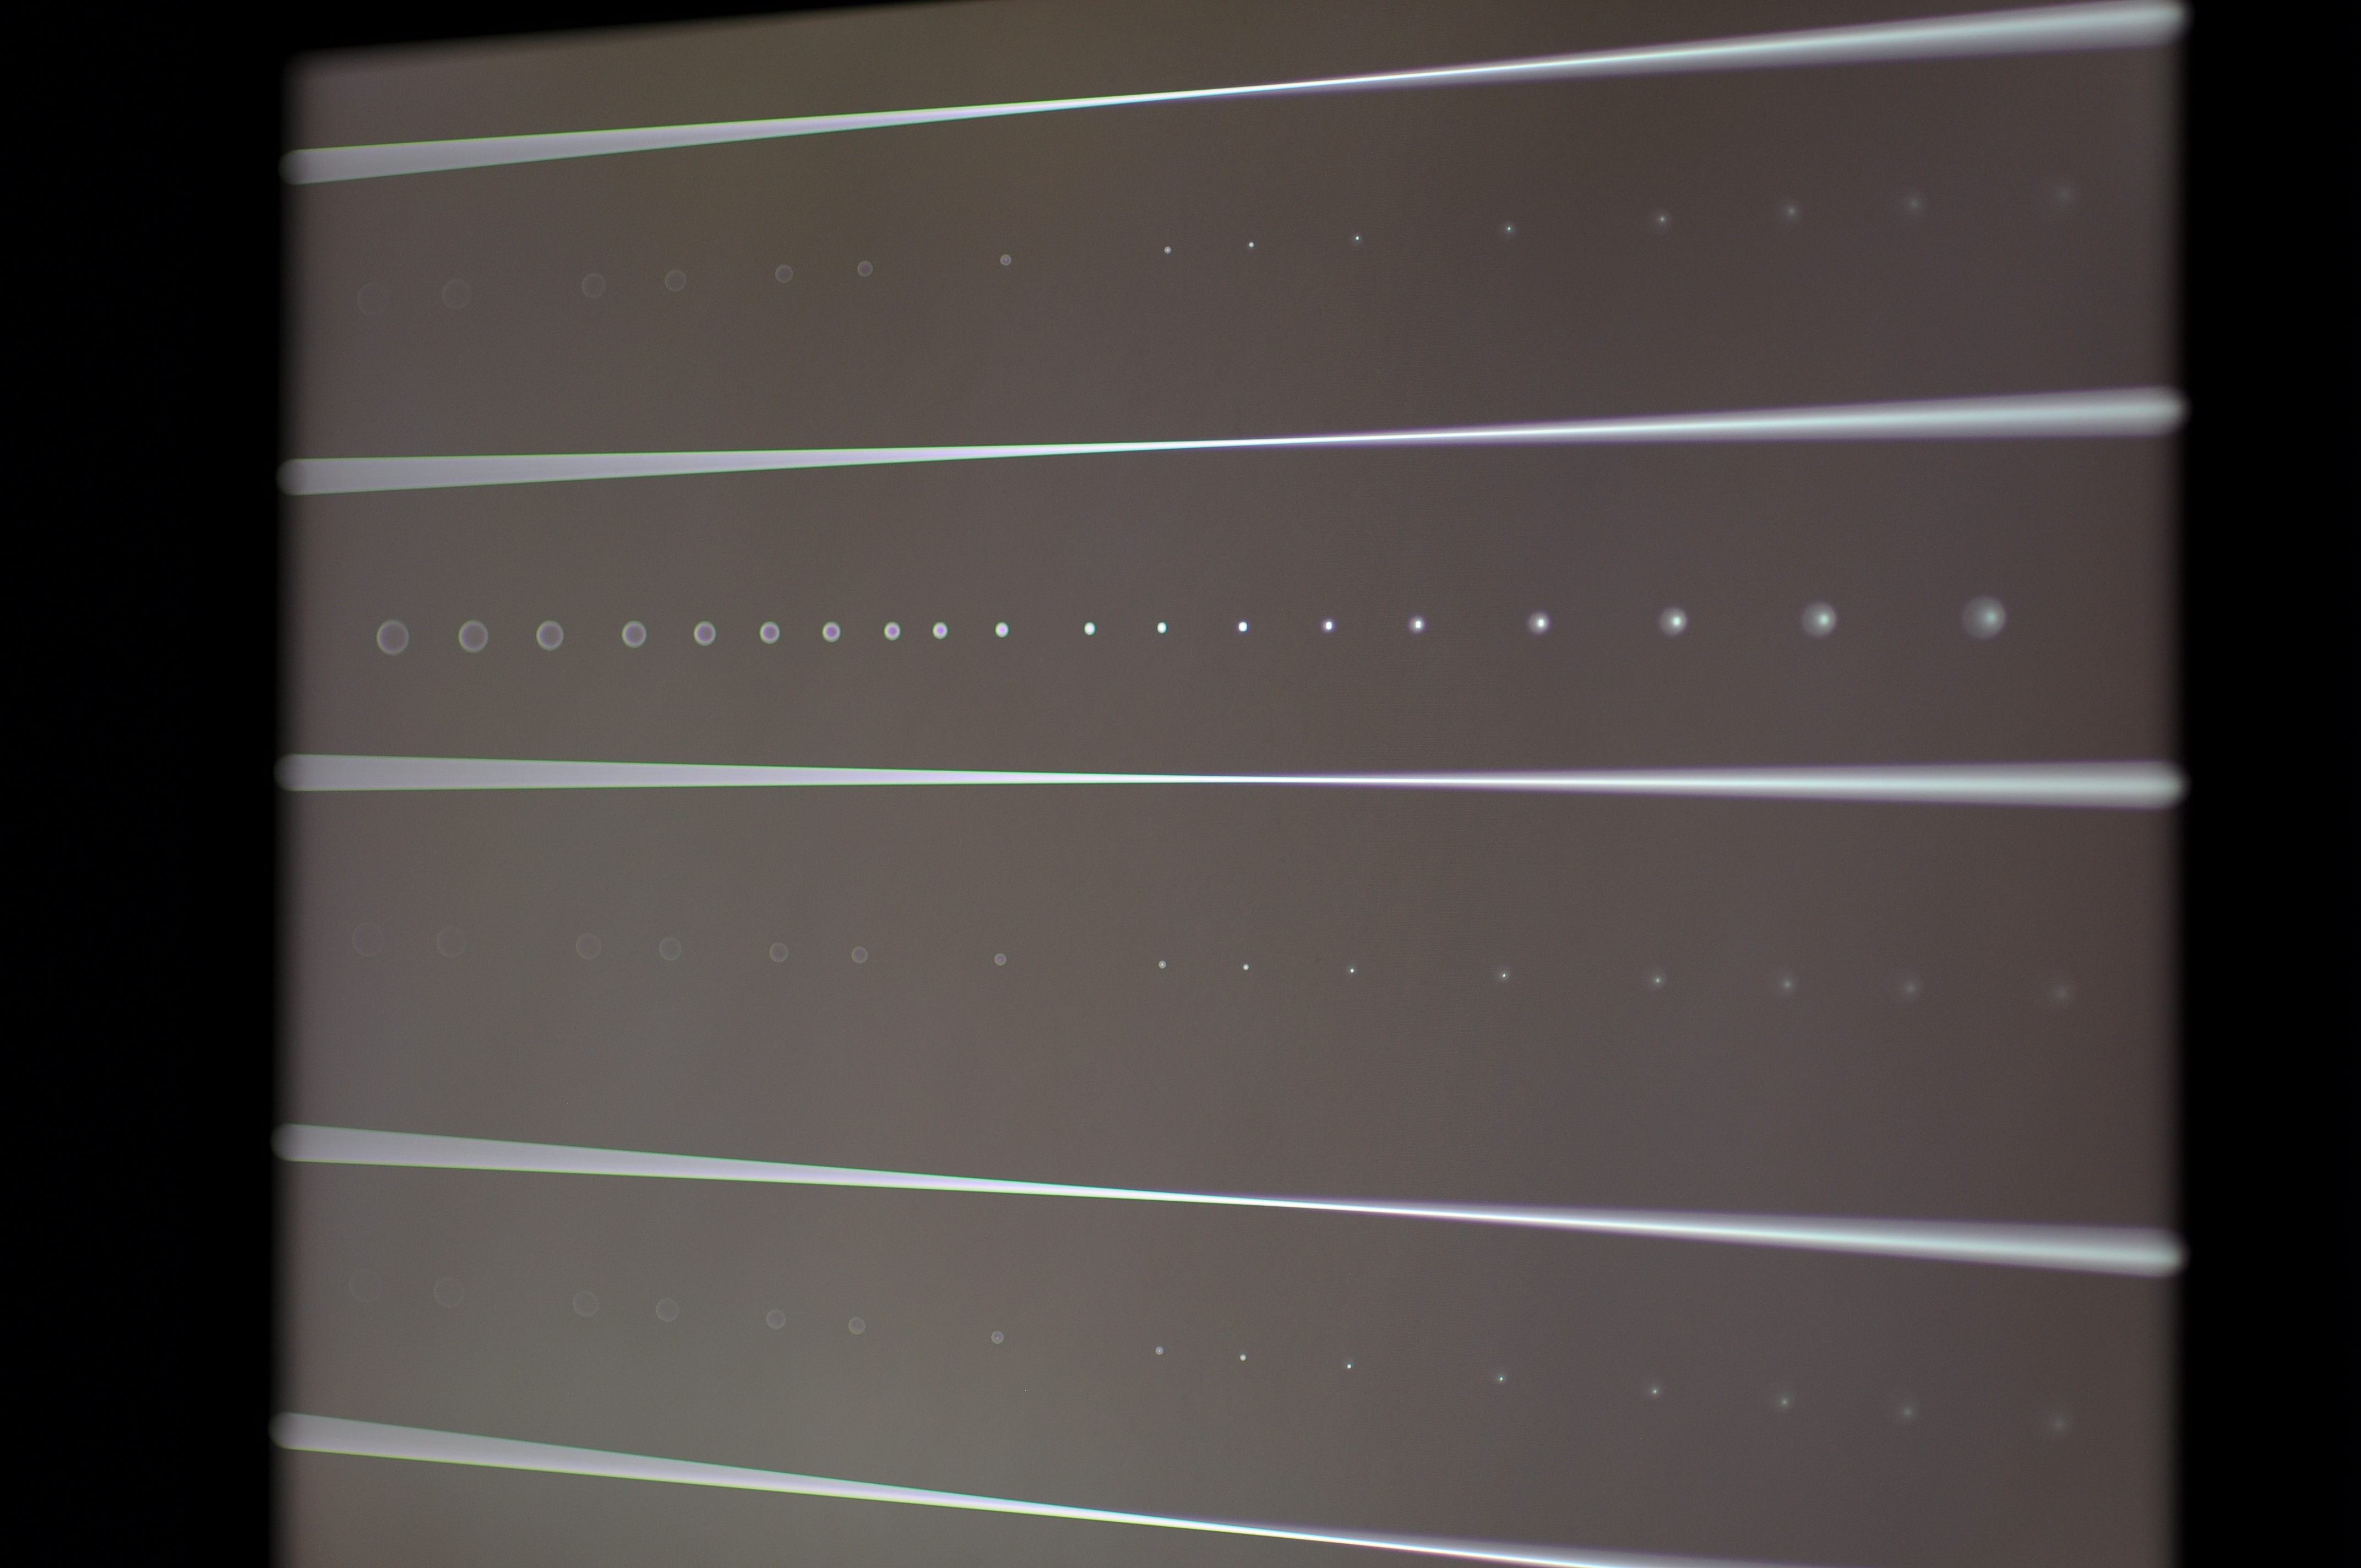
Now, this simulation above may look too artificial and
unintuitive. Real lenses do not behave like this, right? They
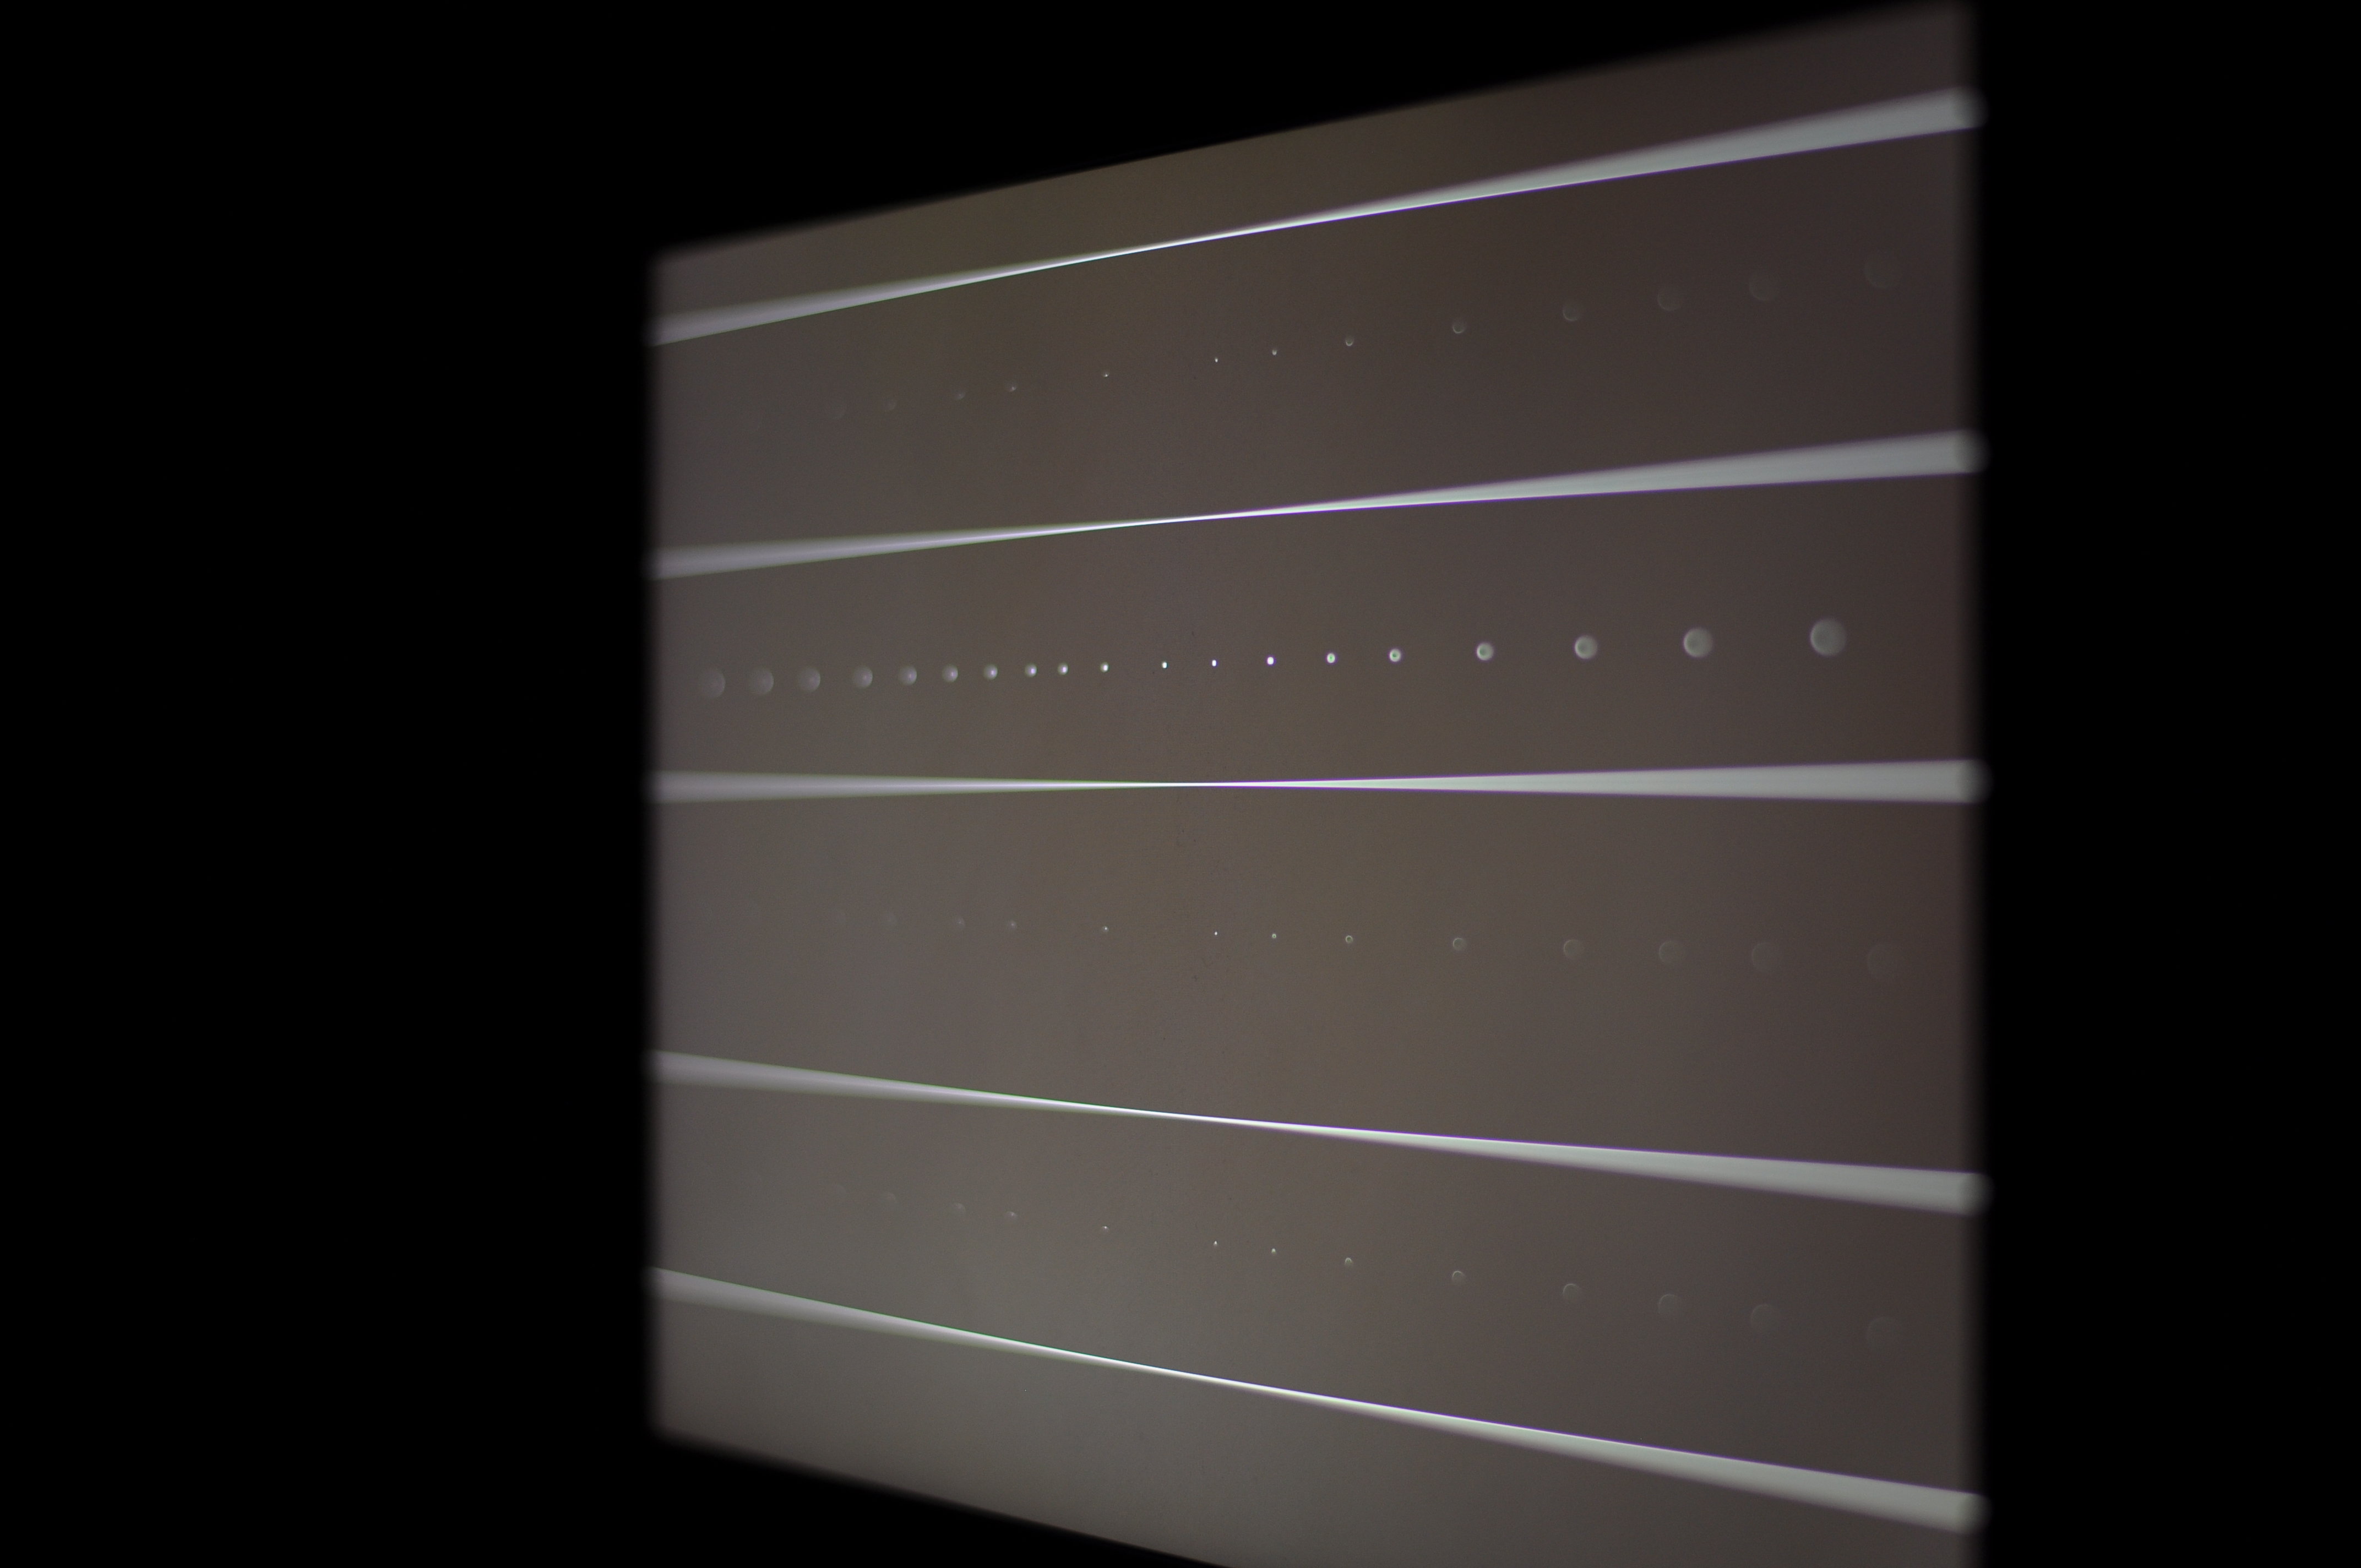
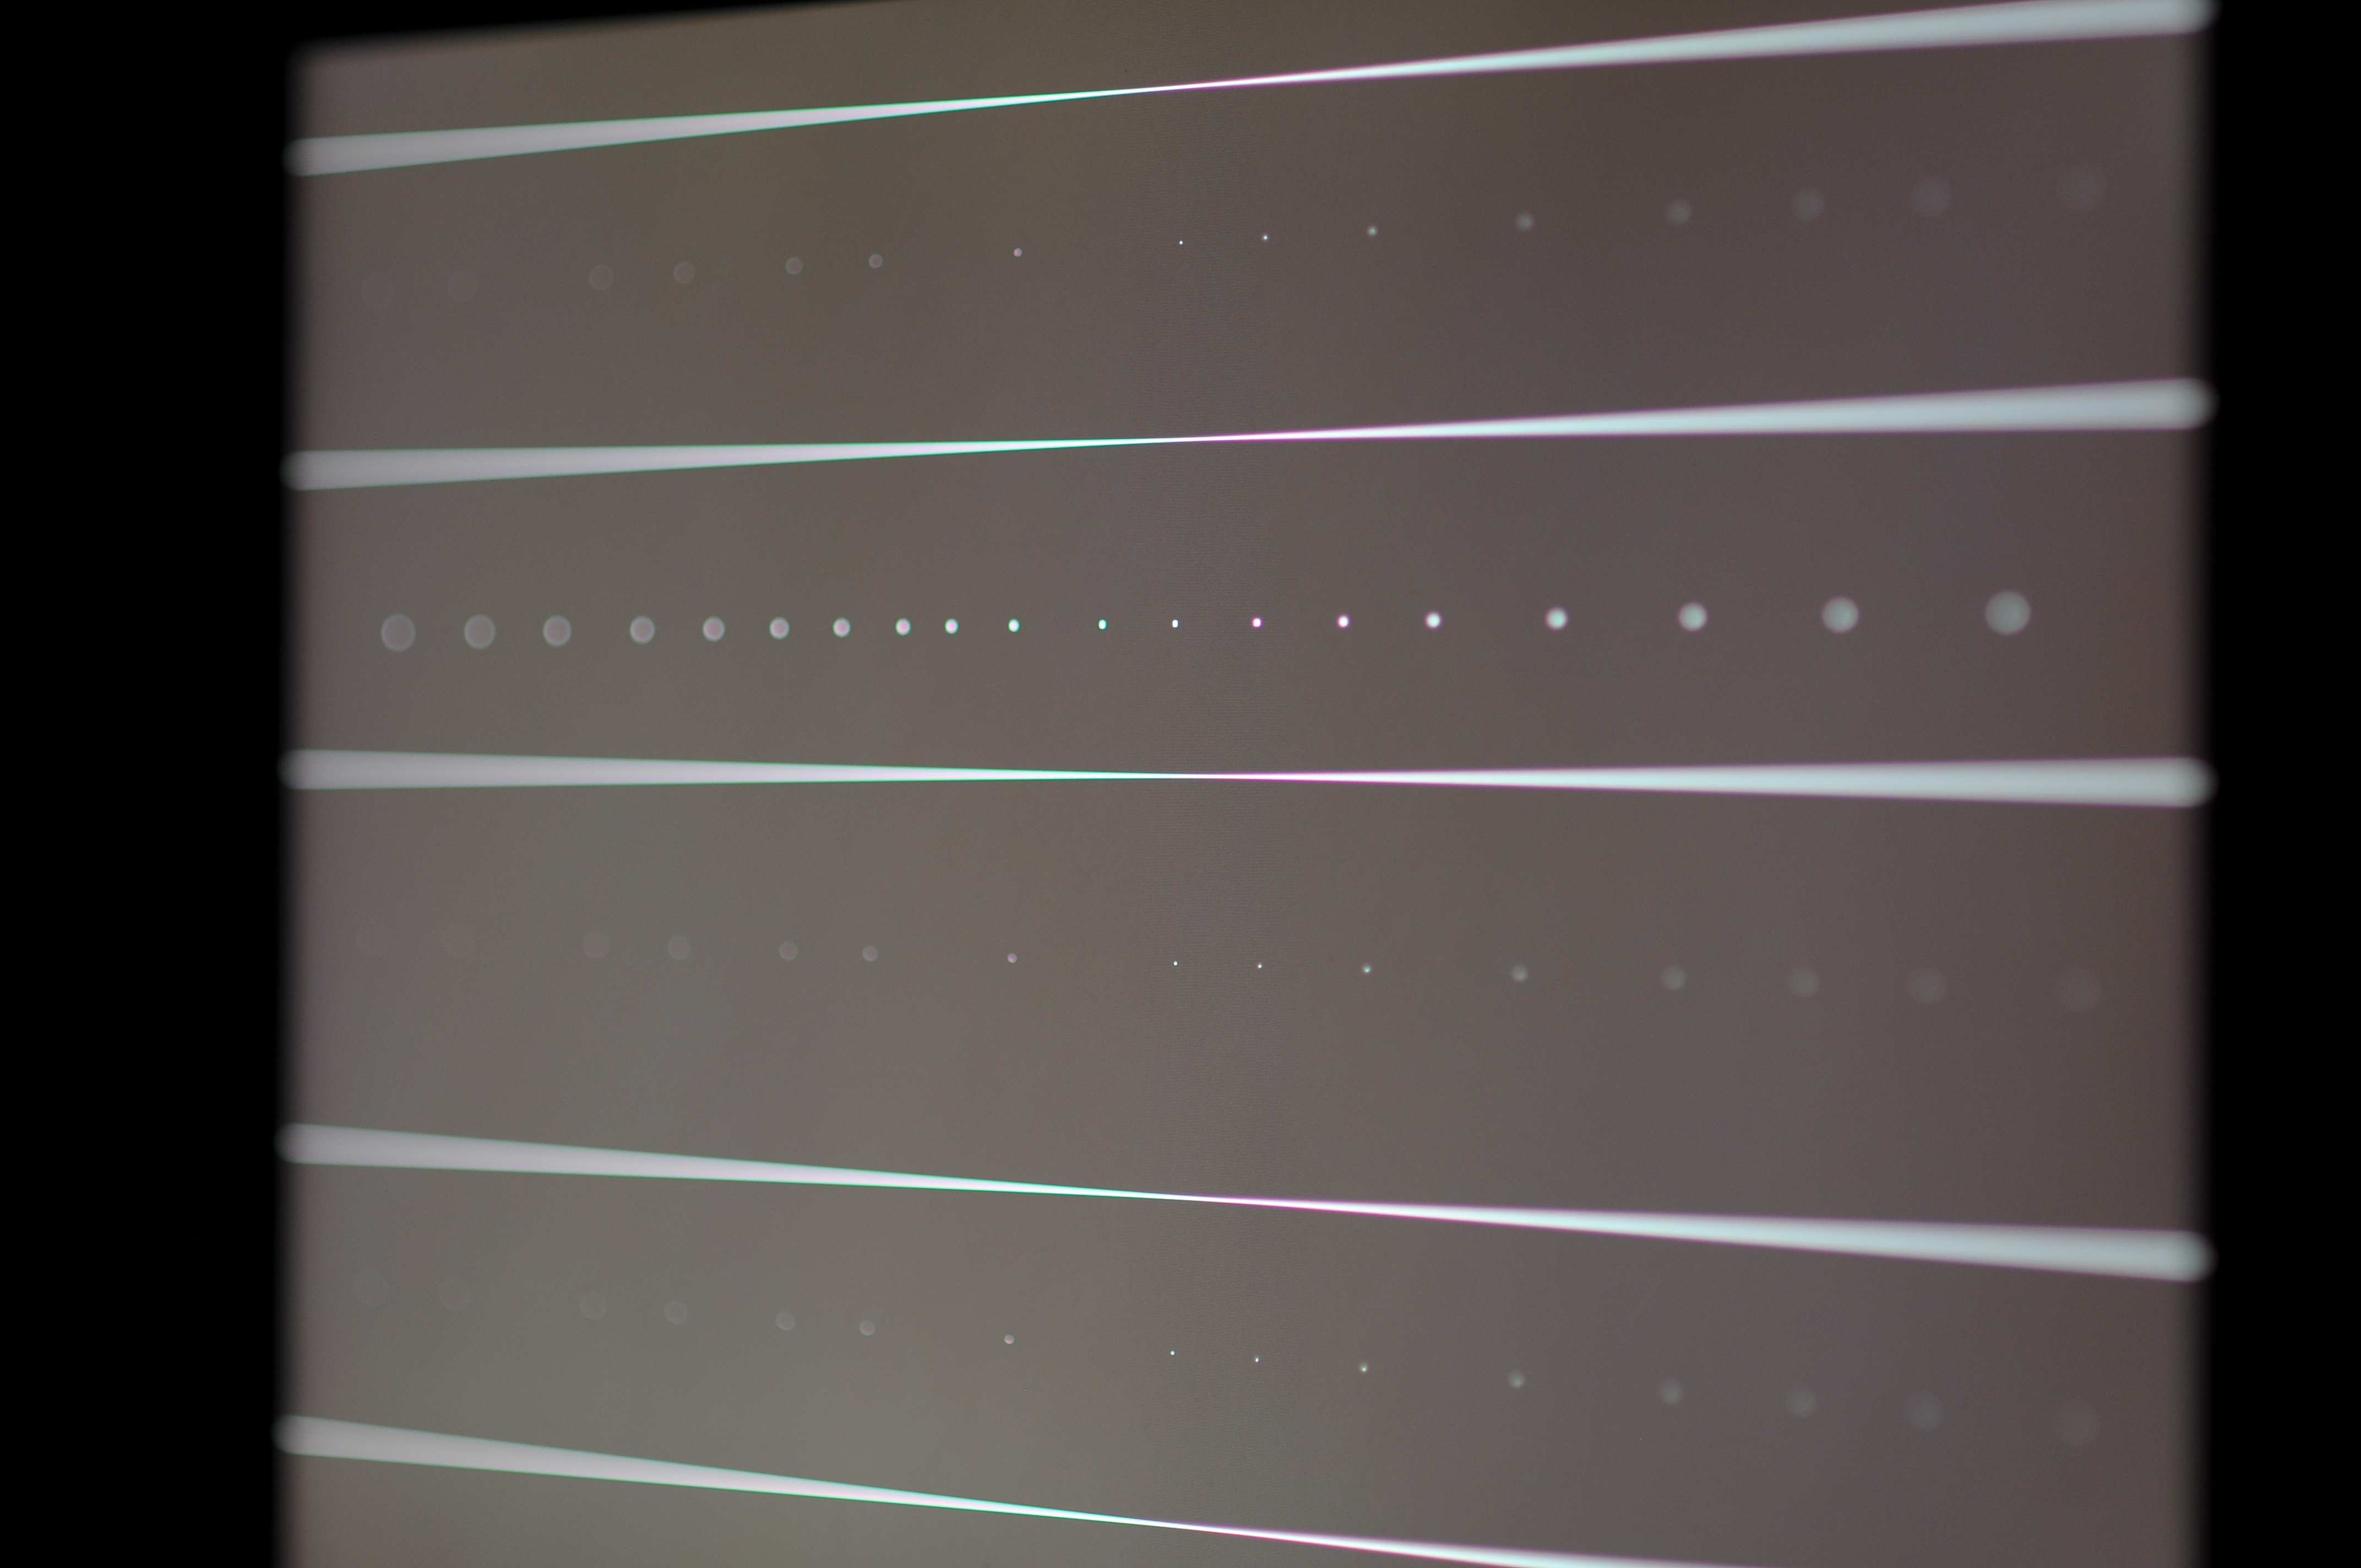
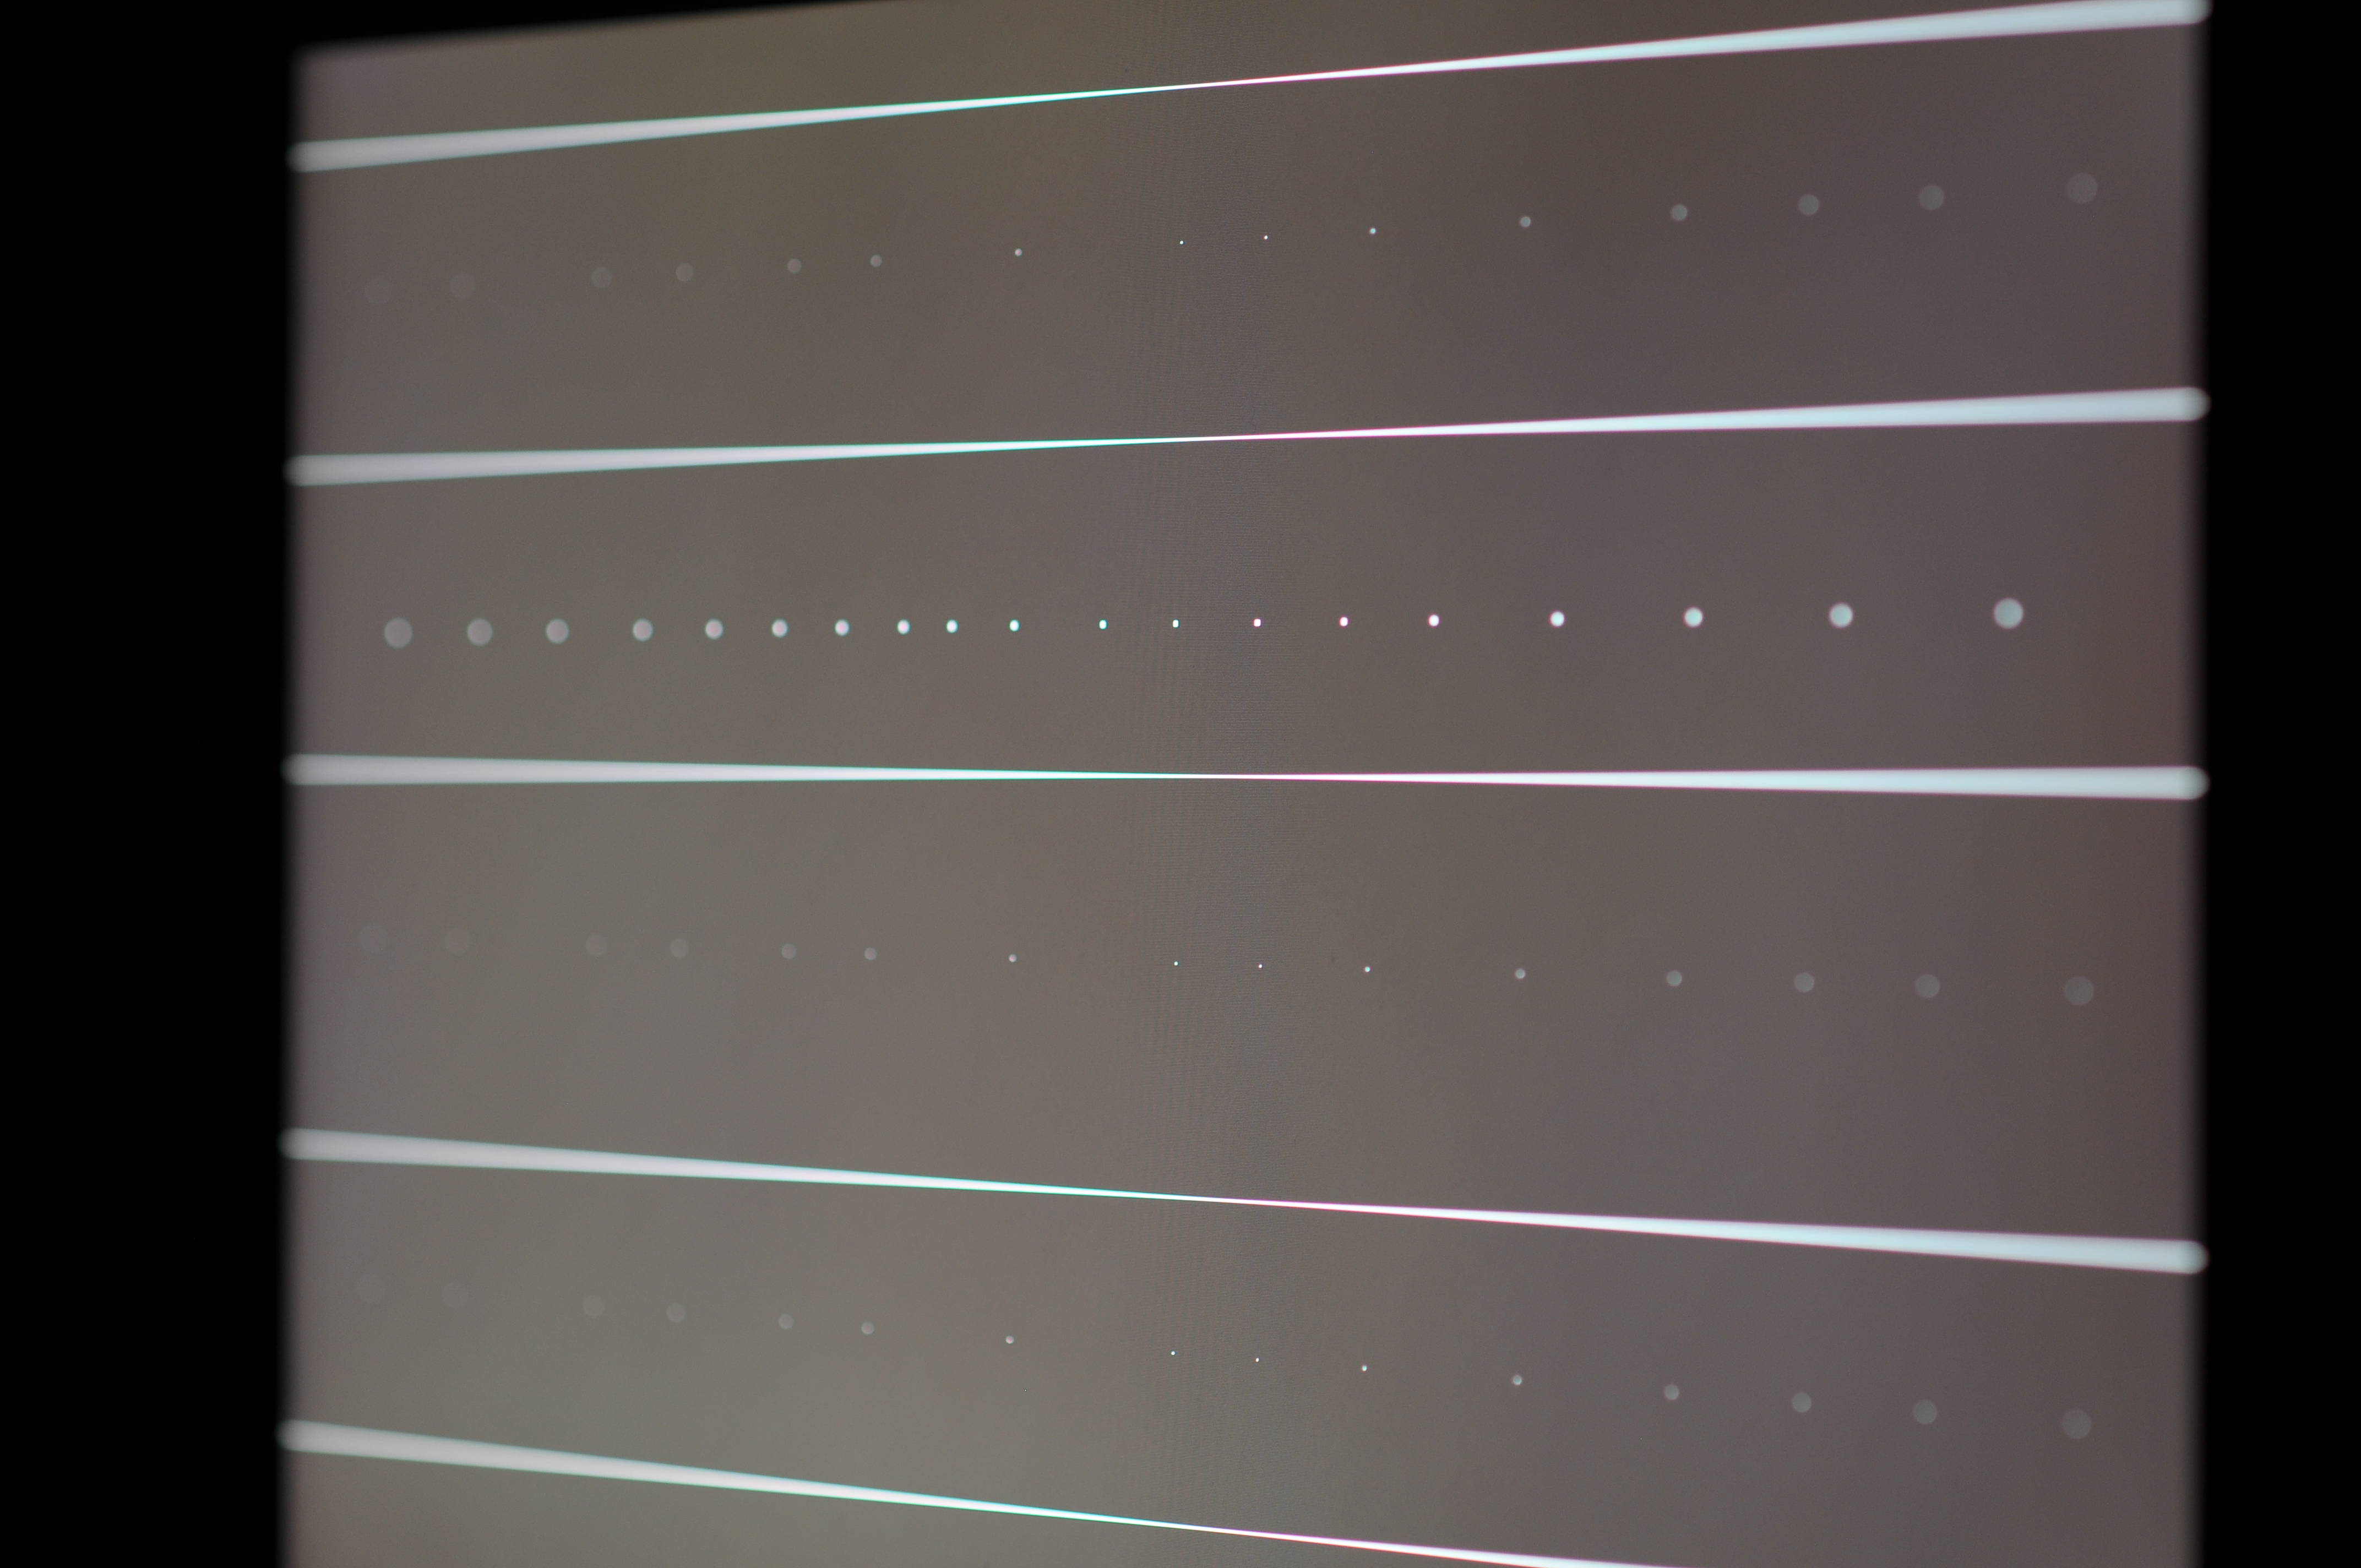
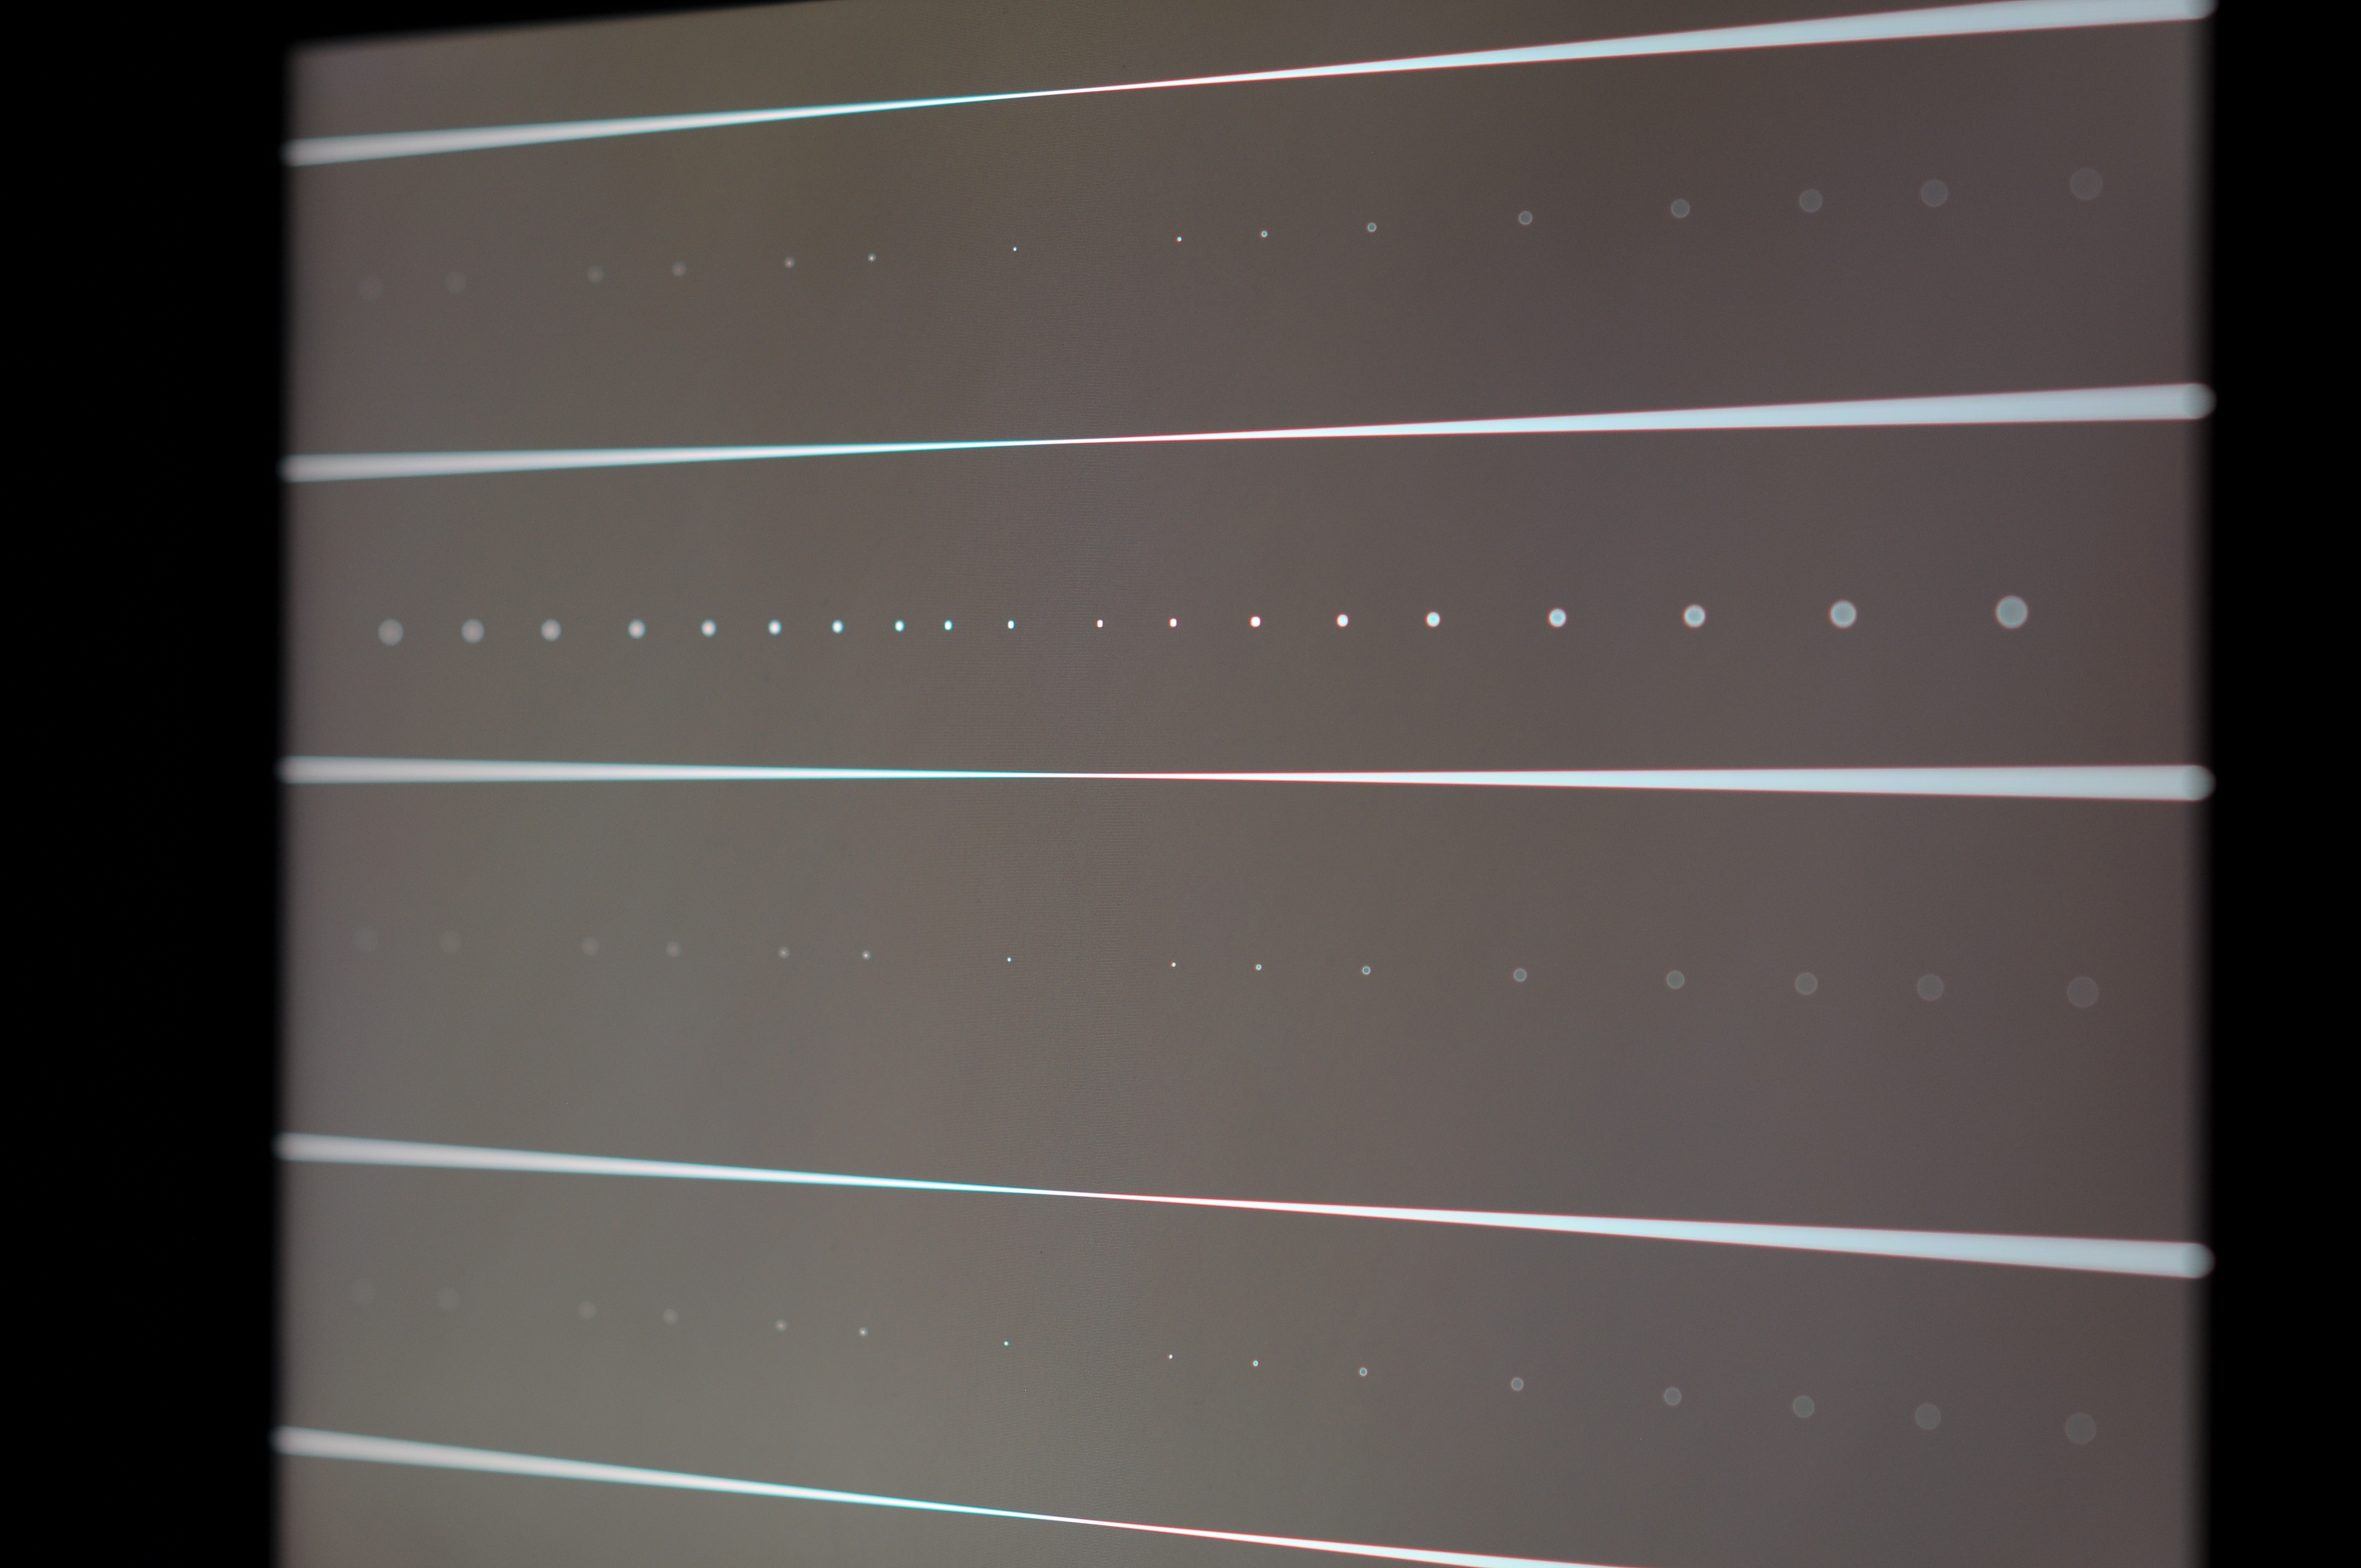
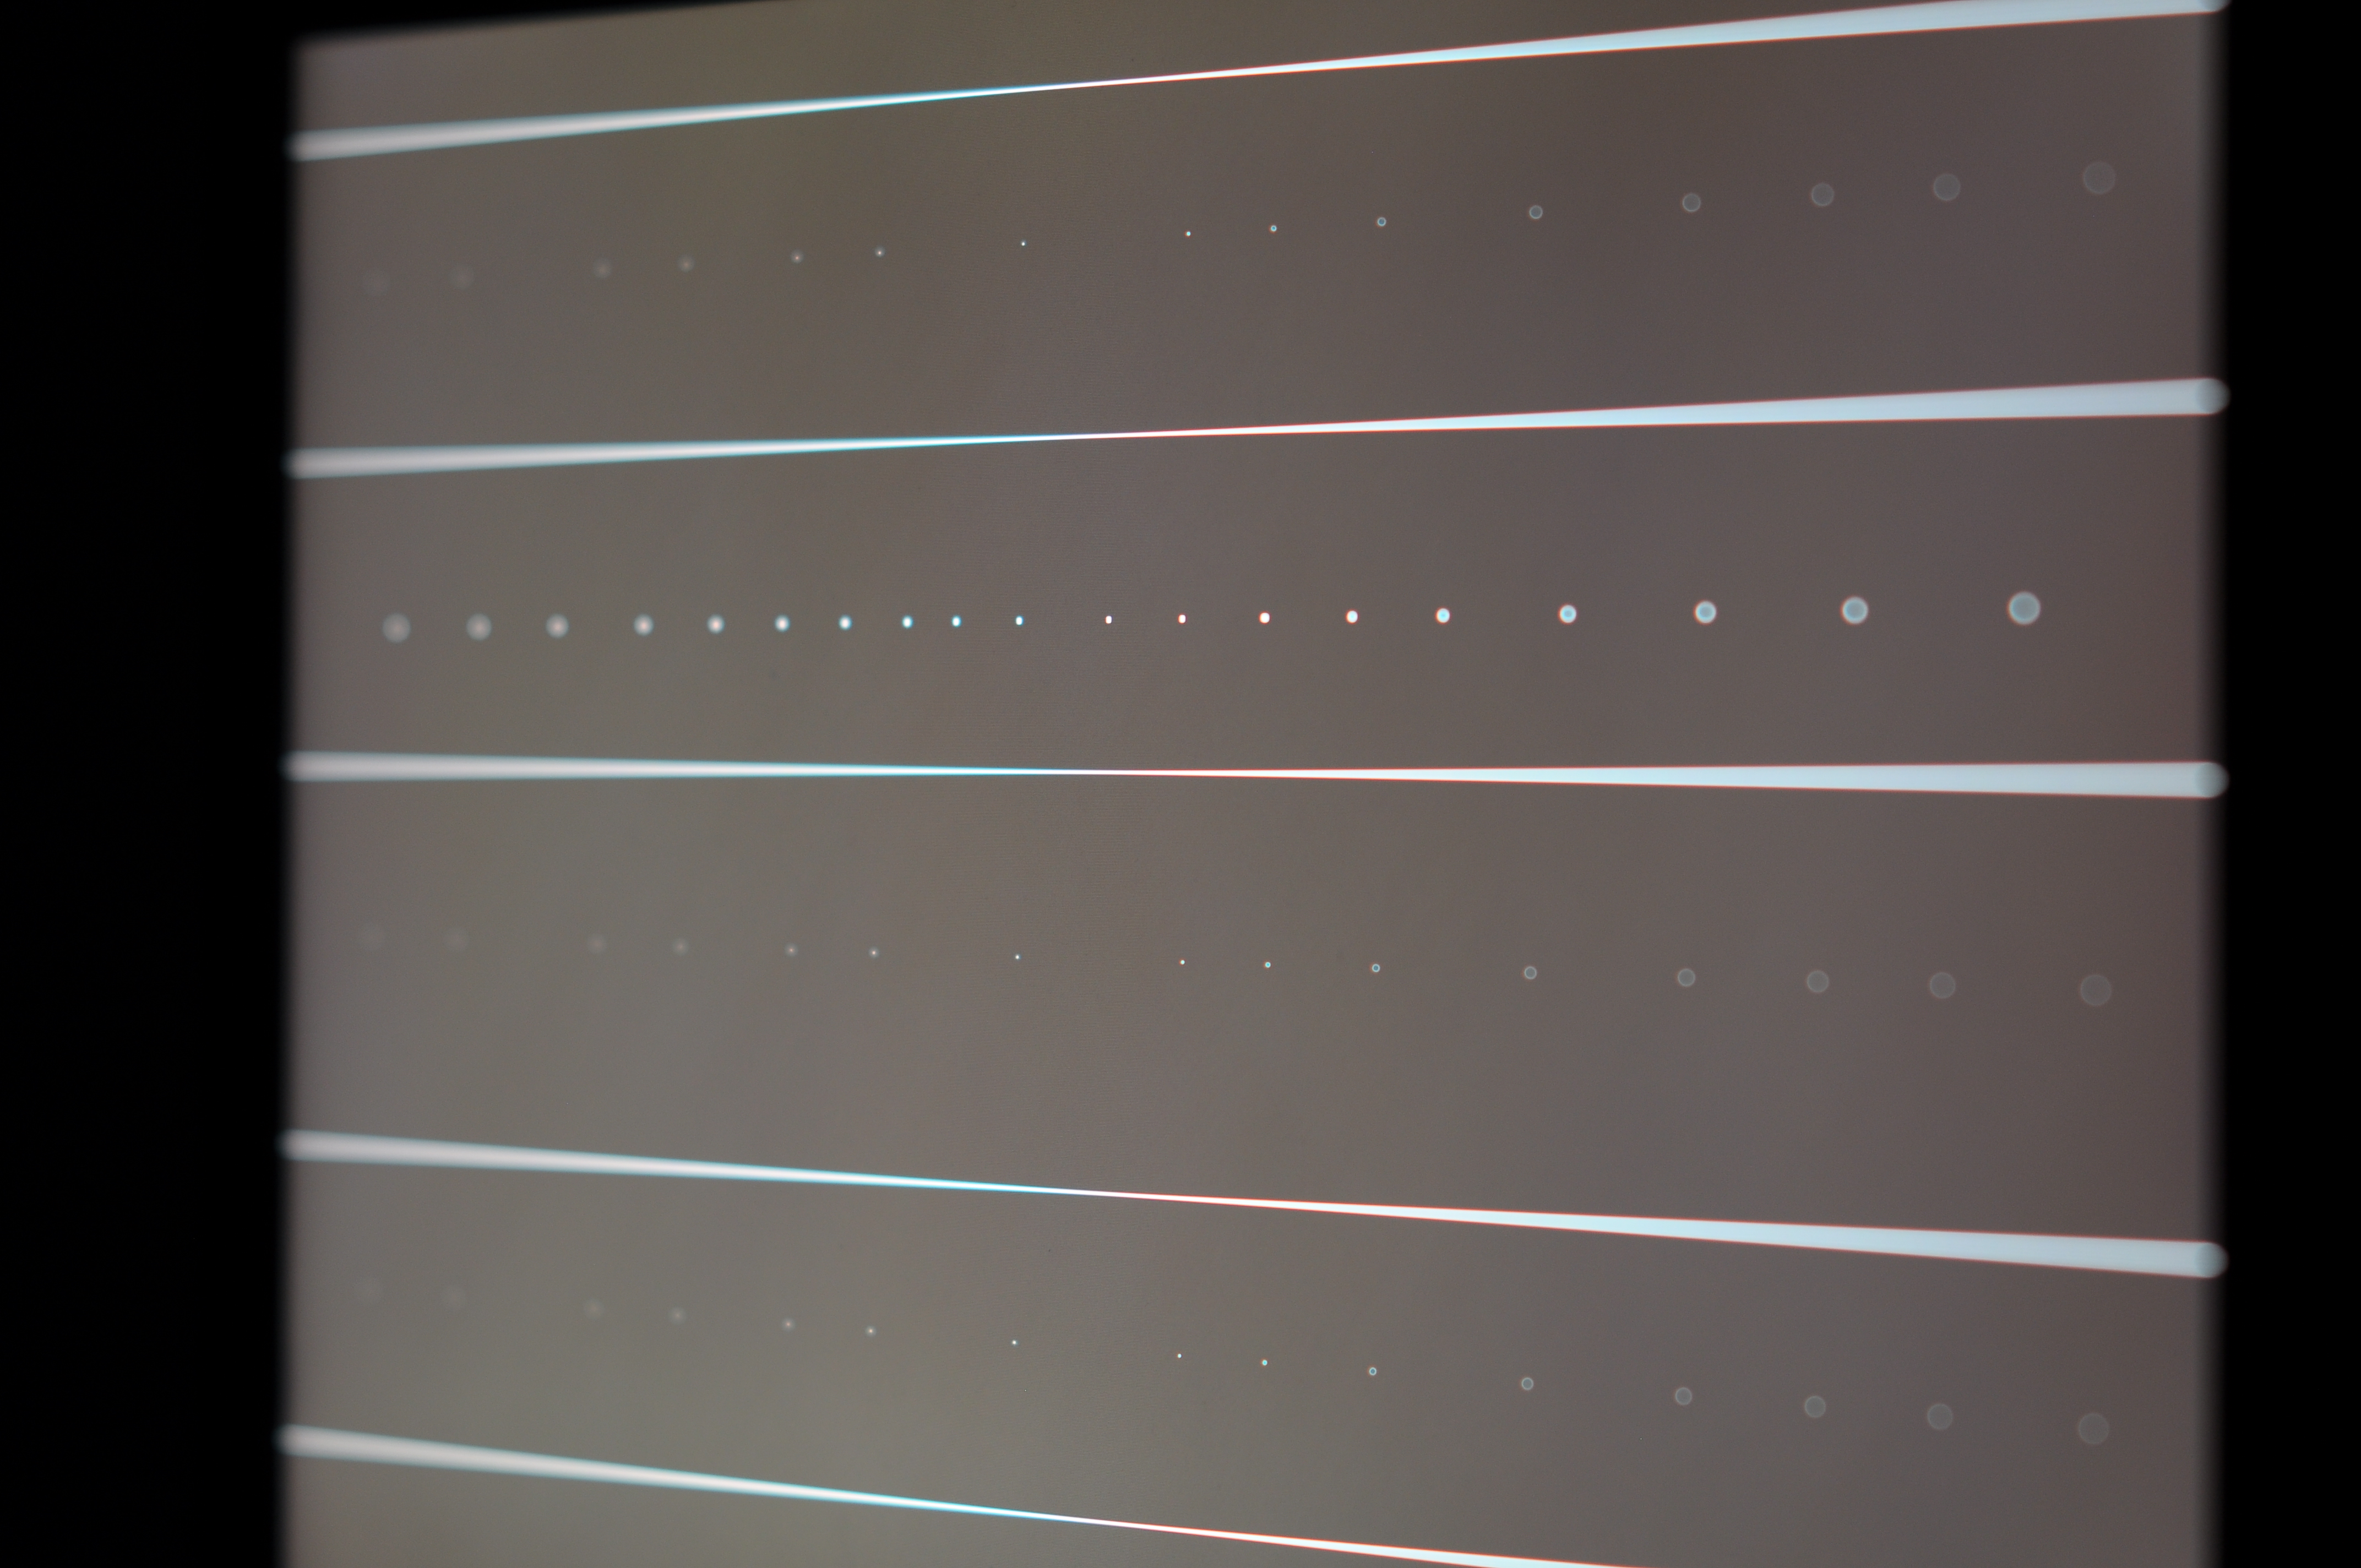
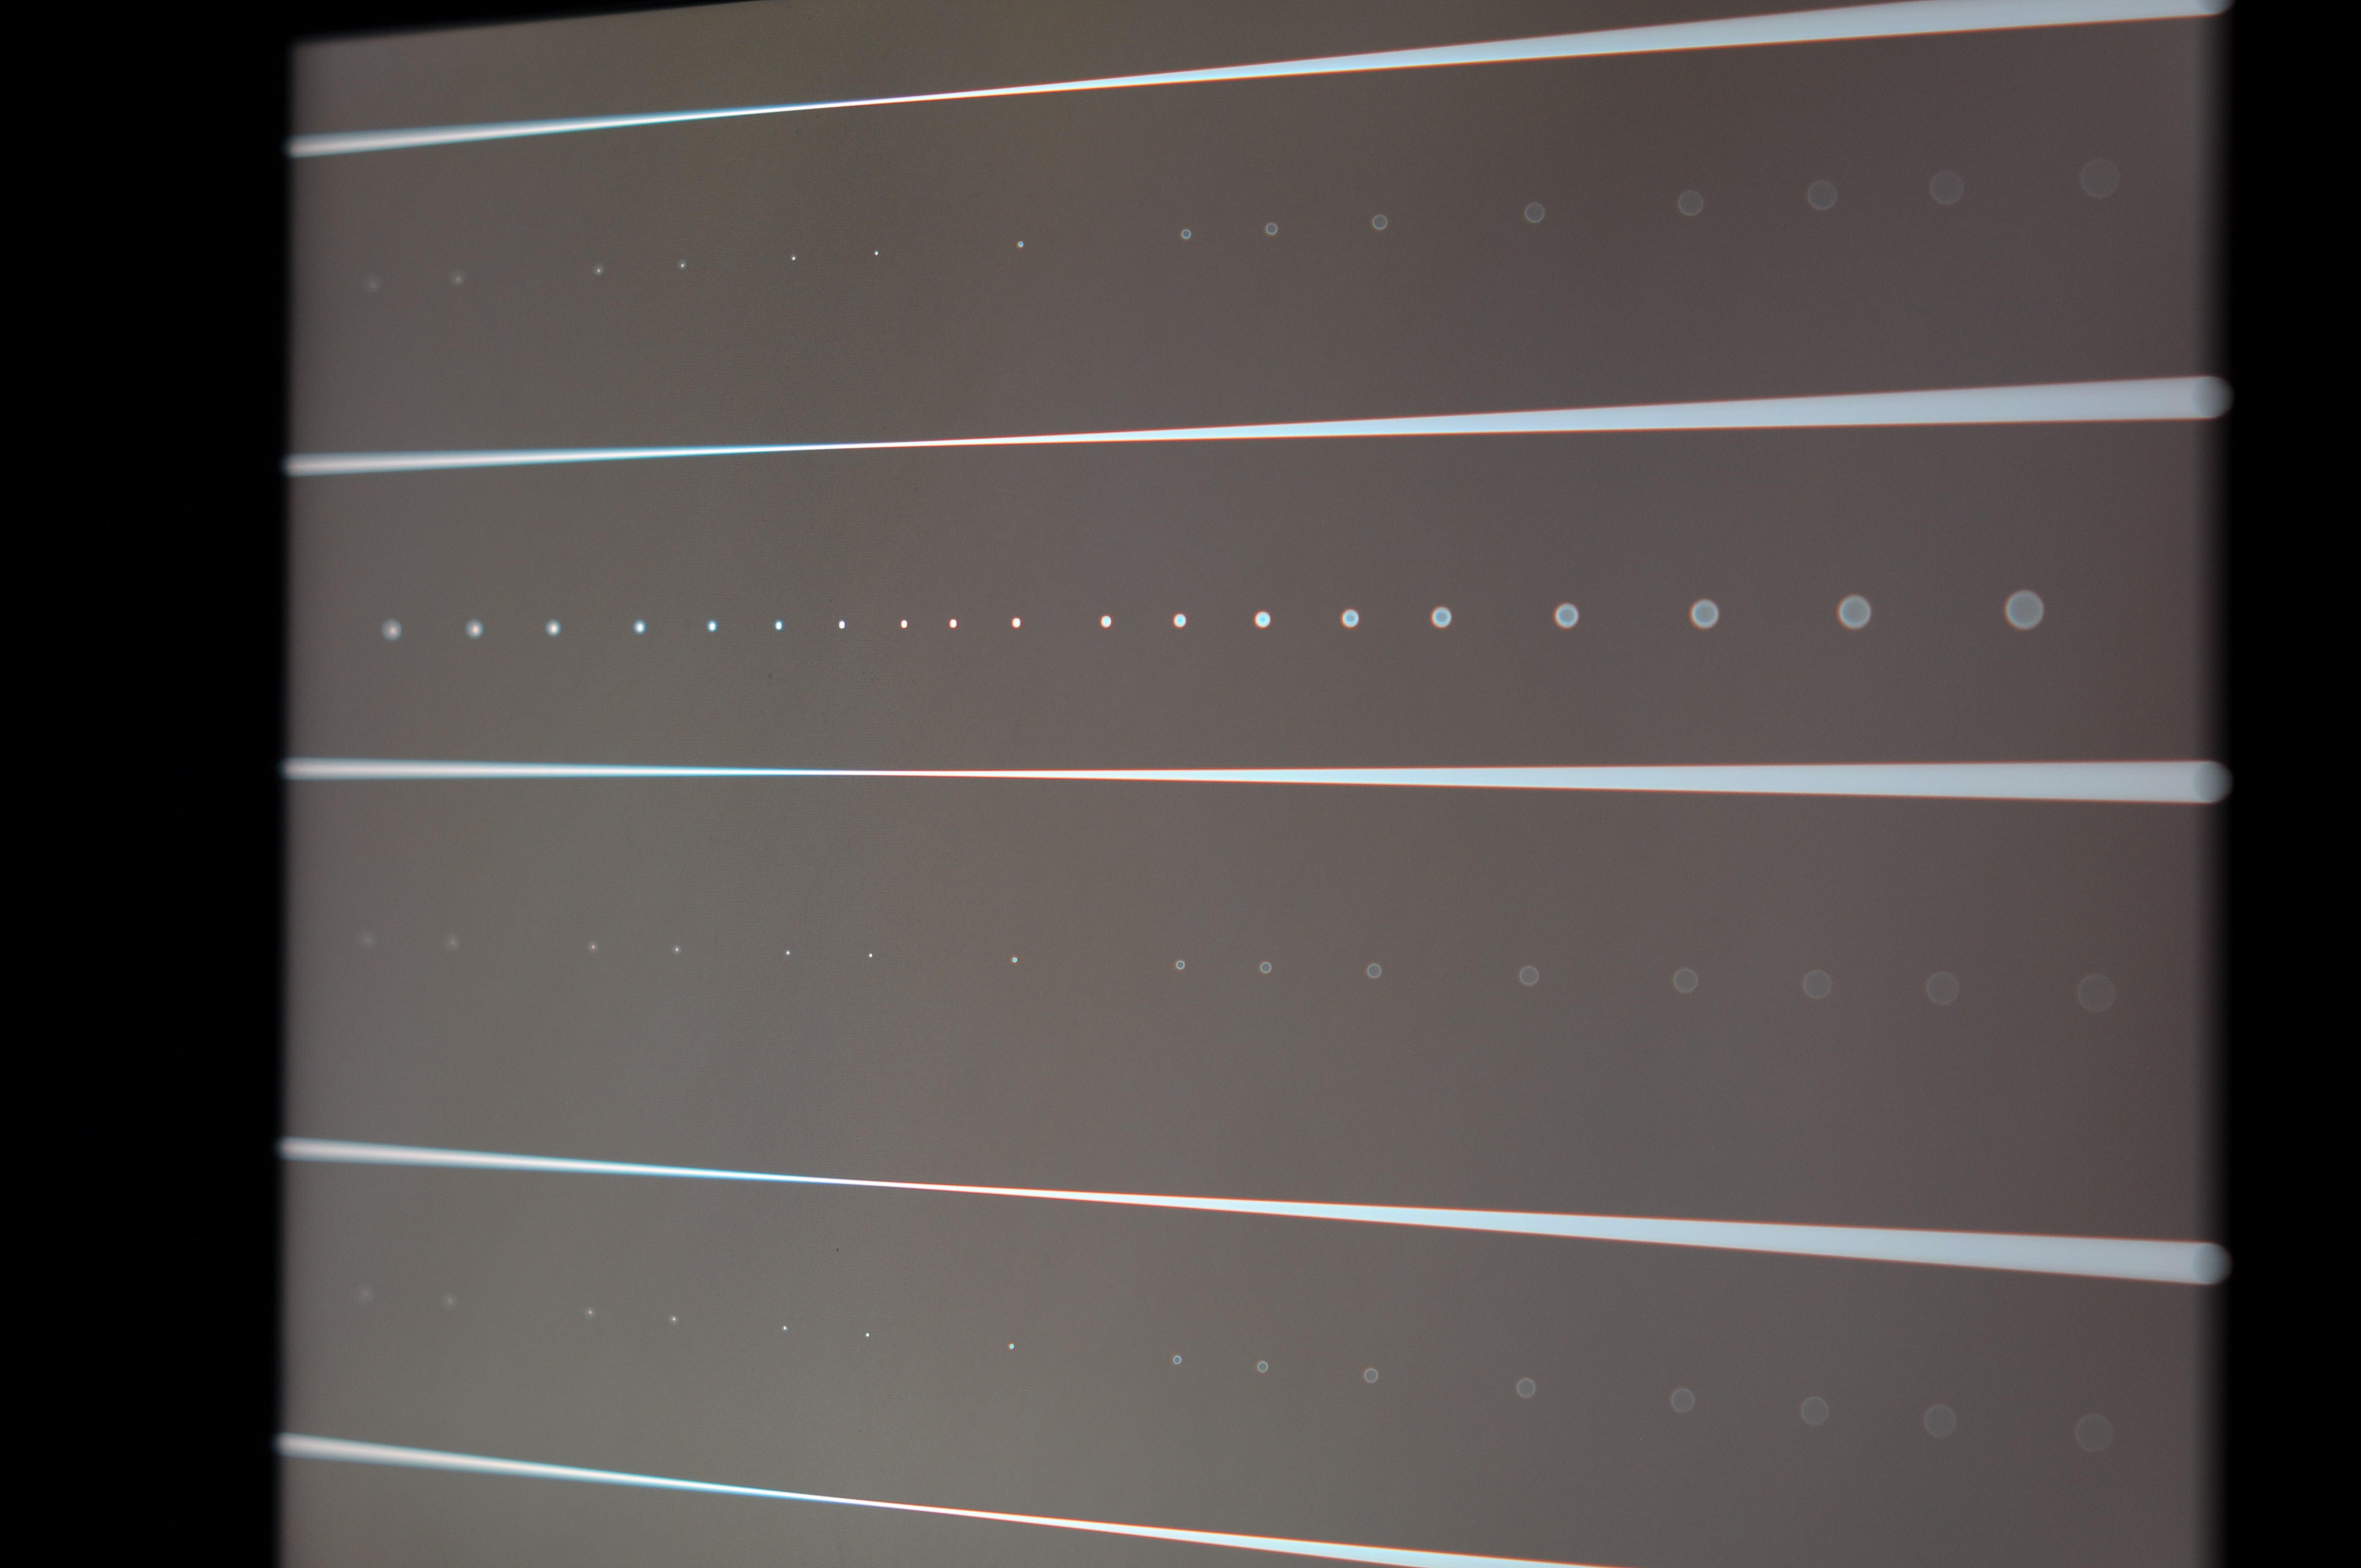
actually do. Just look at this picture below. It is taken by
D90 with Sigma 50/1.4. The test target is here: bokeh-test-lines.png (you can try it with your lenses)
and it is displayed on notebook LCD monitor. Camera is at
angle so that left side of LCD is farther than focus point,
right side is closer.
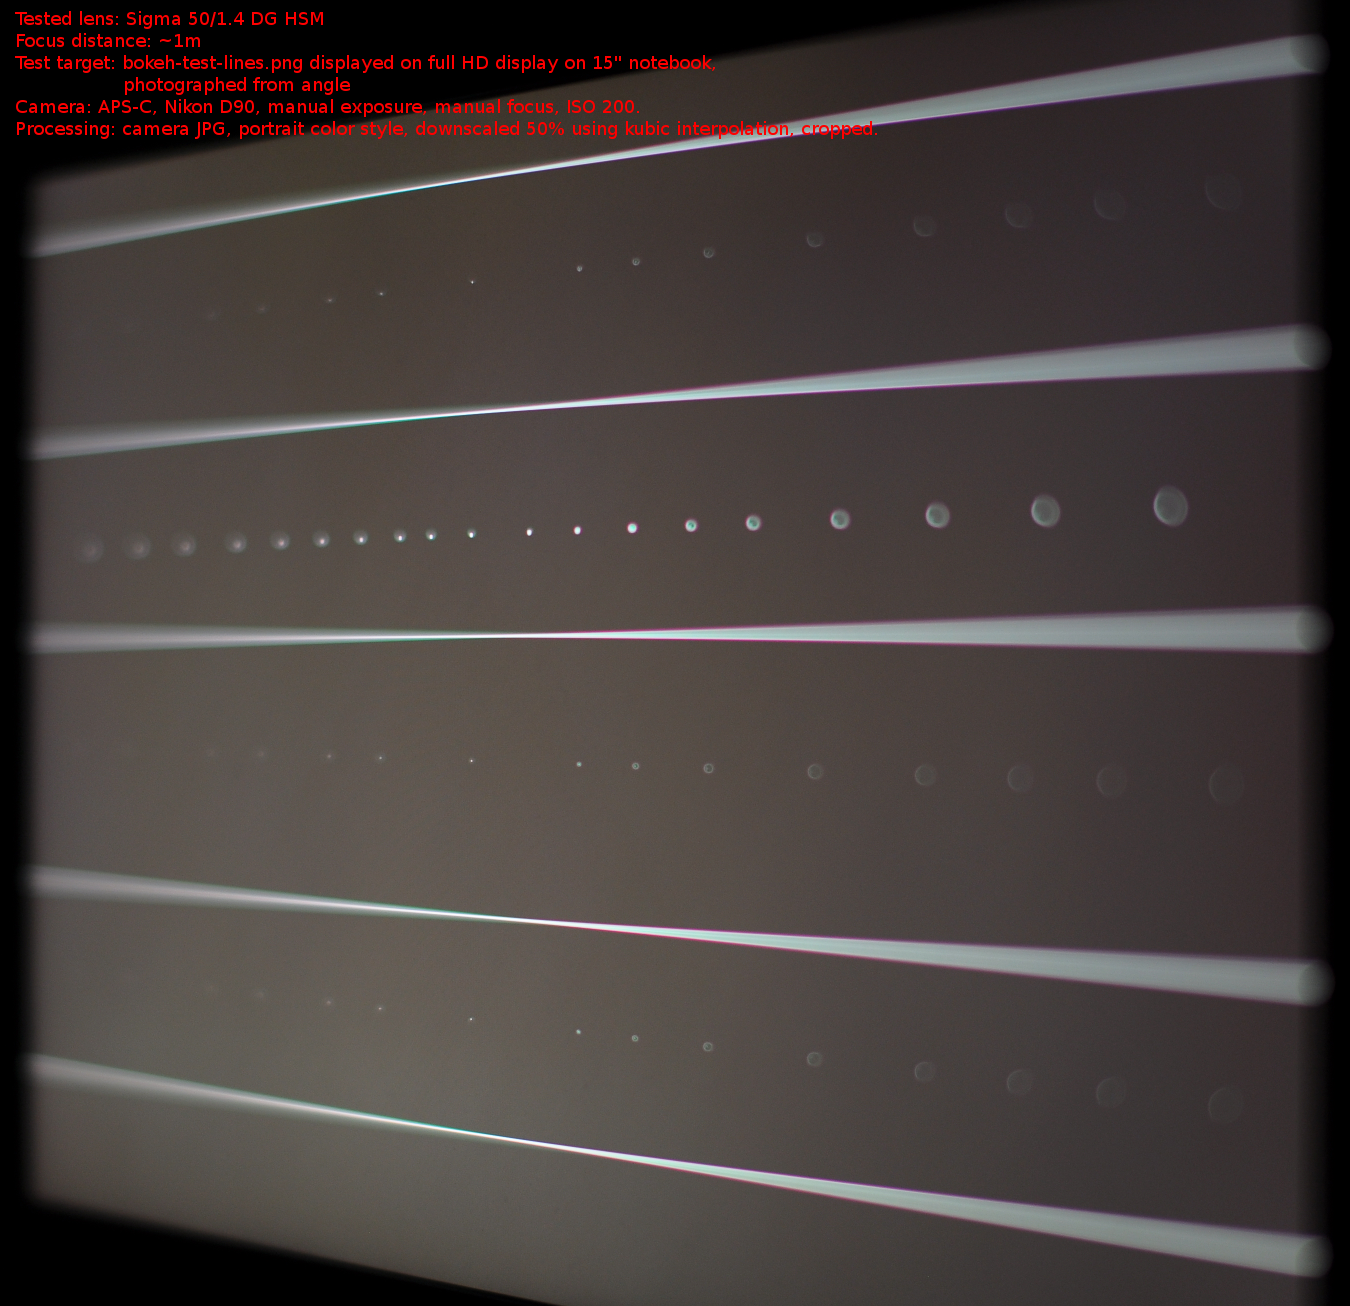
There are red and green colored edges of bokeh - that is longitudinal
chromatic aberration. If you ignore red and green colored
edges, it corresponds pretty well to the simulated sample
of under-corrected spherical aberration, displayed (again) below:
Implications of lenses with under-corrected or over-corrected spherical aberration is that:
- Sharpness is not optimal, but sharpness is way too overrated. Bokeh esthetic is more important in most pictures where it is visible.
- Auto-focus may be confused. Especially phase detect AF as it is using mainly off-center rays that converge outside of area of best focus. Area of best focus depends on aperture - so AF using wide open aperture (common in modern SLR and DSLR with phase detect AF) will not be optimal for closed aperture image capture. This is called focus shift.
- If bokeh behind subject is smooth, bokeh in front of it is edgy for under-corrected. Or vice versa for over-corrected.
- Spherical abberation, if present, can be significantly reduced by stopping aperture down. Bokeh will be more neutral.
With such knowledge, following types of classic lens behaviors will not surprise you (numbering is mine, non-standard, but I will use it for the rest of the article):
- Type 1: A lens has neutral bokeh, light density is equal in full area of out of focus highlights, both in front of focus and in rear of focus. Typical lenses: (super-) tele primes (except for mirror lenses).
- Type 2: A lens has aberrations that create bokeh with pronounced edges for rear out of focus highlights (background). At the same time there are softer bokeh edges for front out of focus highlights in foreground, thus bokeh is creamy there. This can be caused by over-correction of spherical aberration. Background bokeh with edges is often distracting, but sometimes may be used as artistic. Examples of lenses with such bokeh: Nikon 50/1.4g, Nikon AF-D 85/1.8. Sample 1 - 50/1.4g in Photozone review Sample 2 - Nikon 85/1.8d in Photozone review.
- Type 3: A converse of previous point - background bokeh is creamy, foreground has pronounced edges. This can be caused by under-correction of spherical aberration. Example: Sigma 50/1.4. Tamron 60/2 macro. Sample - Tamron 60/2 in Photozone review.
Note that effect of spherical aberration is strongest close the focused plane. So if you focus on close distance, SA may not be impacting highlights at infinity that much. But if you focus far, SA will impact it.
Bokeh Samples
Sigma 50/1.4 DG HSM
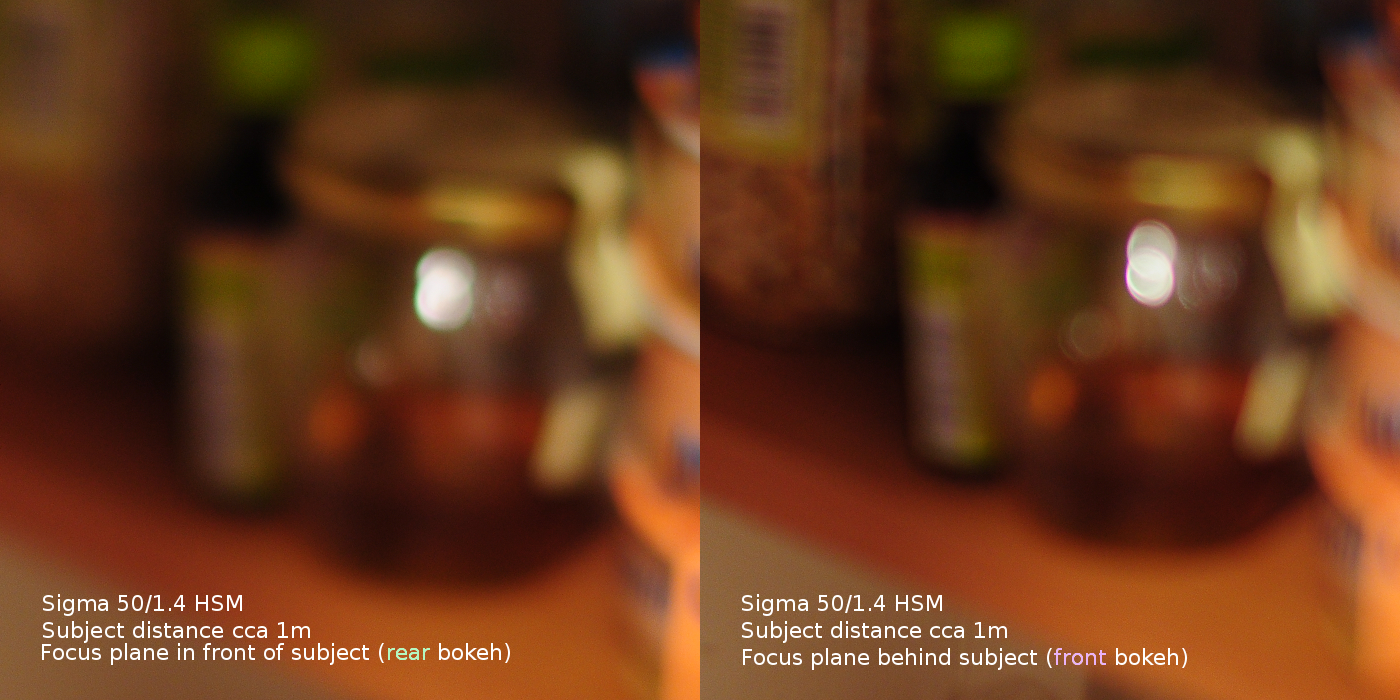
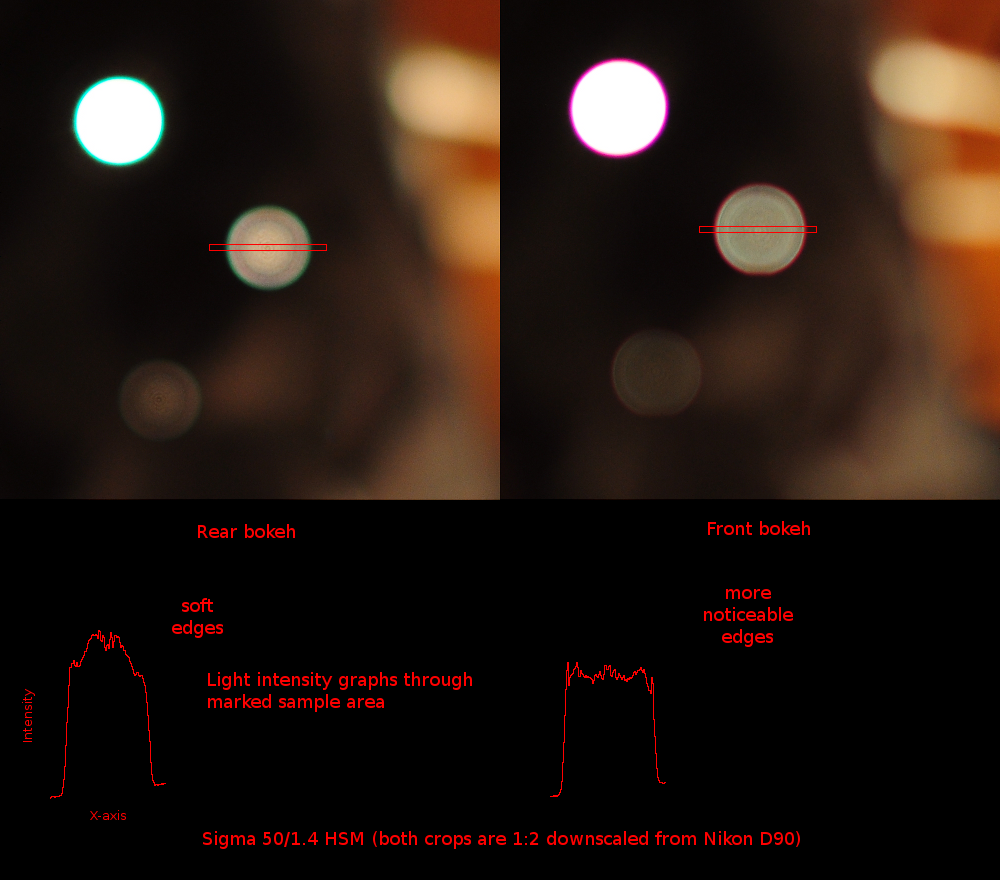
Samples of Sigma 50/1.4 DG HSM which mostly belongs to type 3 - the
rear bokeh has softer edges and front bokeh has more
noticeable edges (note: both pictures are JPGs in landscape
picture control with sharpening value 5 of range 0 to 9):
But things are not so simple when used on full frame camera.
Background bokeh outside of APS-C frame is distracting. Look
at two pictures below. The first is at f/1.4, the second is at
f/2.5, both out of camera JPEG taken with Nikon D600. Both
show that in about APS-C frame the Sigma 50/1.4 has smooth
background bokeh, while near corners, sides and elsewhere
outside of APS-C frame, the bokeh is not smooth, it is edgy.
Just compare center area with bottom right corner. It is also
quite triangular in corners.

Sigma 50/1.4 outdoor at f/1.4. Click here to see full 24MP picture.
Sigma 50/1.4 outdoor at f/2.5. Click here to see full 24MP picture.
Additional bokeh samples of Sigma 50/1.4 using bokeh-test-lines.png with focus distance around 1m, on tripod, at
several apertures, Nikon D90:

f/1.4 t=1/20s
f/2.0 t=1/10s
f/2.8 t=1/5s
f/4.0 t=1/2.5s
You can see there is some focus shift, but note that focus ring was not moved during those exposures (and camera was in manual focus mode).
Best focus for f/1.4 is near center of screen, but best focus for f/4 has moved to the left (farther).
Nikon 50/1.8G AF-S
Nikon 50/1.8G AF-S has similar type of bokeh as Sigma 50/1.4. Note that Nikon 50/1.4G AF-S is different.
Bokeh in background is smooth, bokeh in foreground has pronouced edges.

Additional bokeh samples of Nikon 50/1.8G using bokeh-test-lines.png with focus distance around 0.8m, on tripod, at
several apertures, Nikon D90:

f/1.8 t=1/13s In fact there is no change visible between f/1.8 and f/2.0. Perhaps aperture lever is not well calibrated? Brightness change is due to shutter time change.
f/2.0 t=1/10s
f/2.8 t=1/5s
f/4.0 t=1/2.5s
Here is outdoor series of pictures with varying apertures:
f/1.8
f/2.2
f/2.8
f/4.0
Look how bokeh is smooth enough in the center. But it is not
so smooth even near bottom and on sides. Note that this is DX
frame. While Sigma 50/1.4 has also less smooth background
bokeh outside center, the effect is only visible in FX frame.
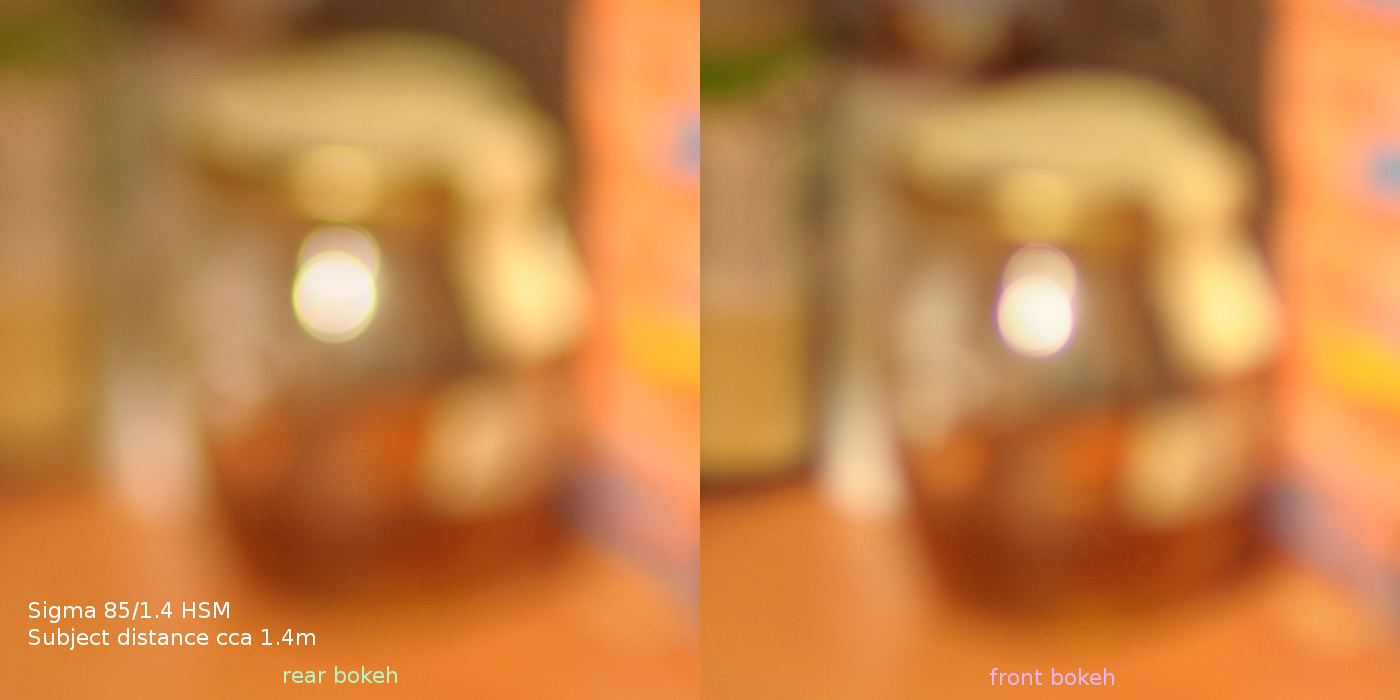
Sigma 85/1.4 DG HSM
Samples of Sigma 85/1.4 which mostly belongs to type
1 (shorter focus distances), and to type 2 (longer focus
distances). Both rear and front bokeh is fairly "flat" or
normal at shorter distances, but front is slightly more
smooth. At longer focus distances you can see edges very
clearly. I would rather prefer more smooth rear bokeh, like
I have seen in pictures of cheap Samyang (or Vivitar) 85/1.4,
but that one does not autofocus. These were captured as JPG in
portrait picture control with sharpening 5 of range 0 to 9.

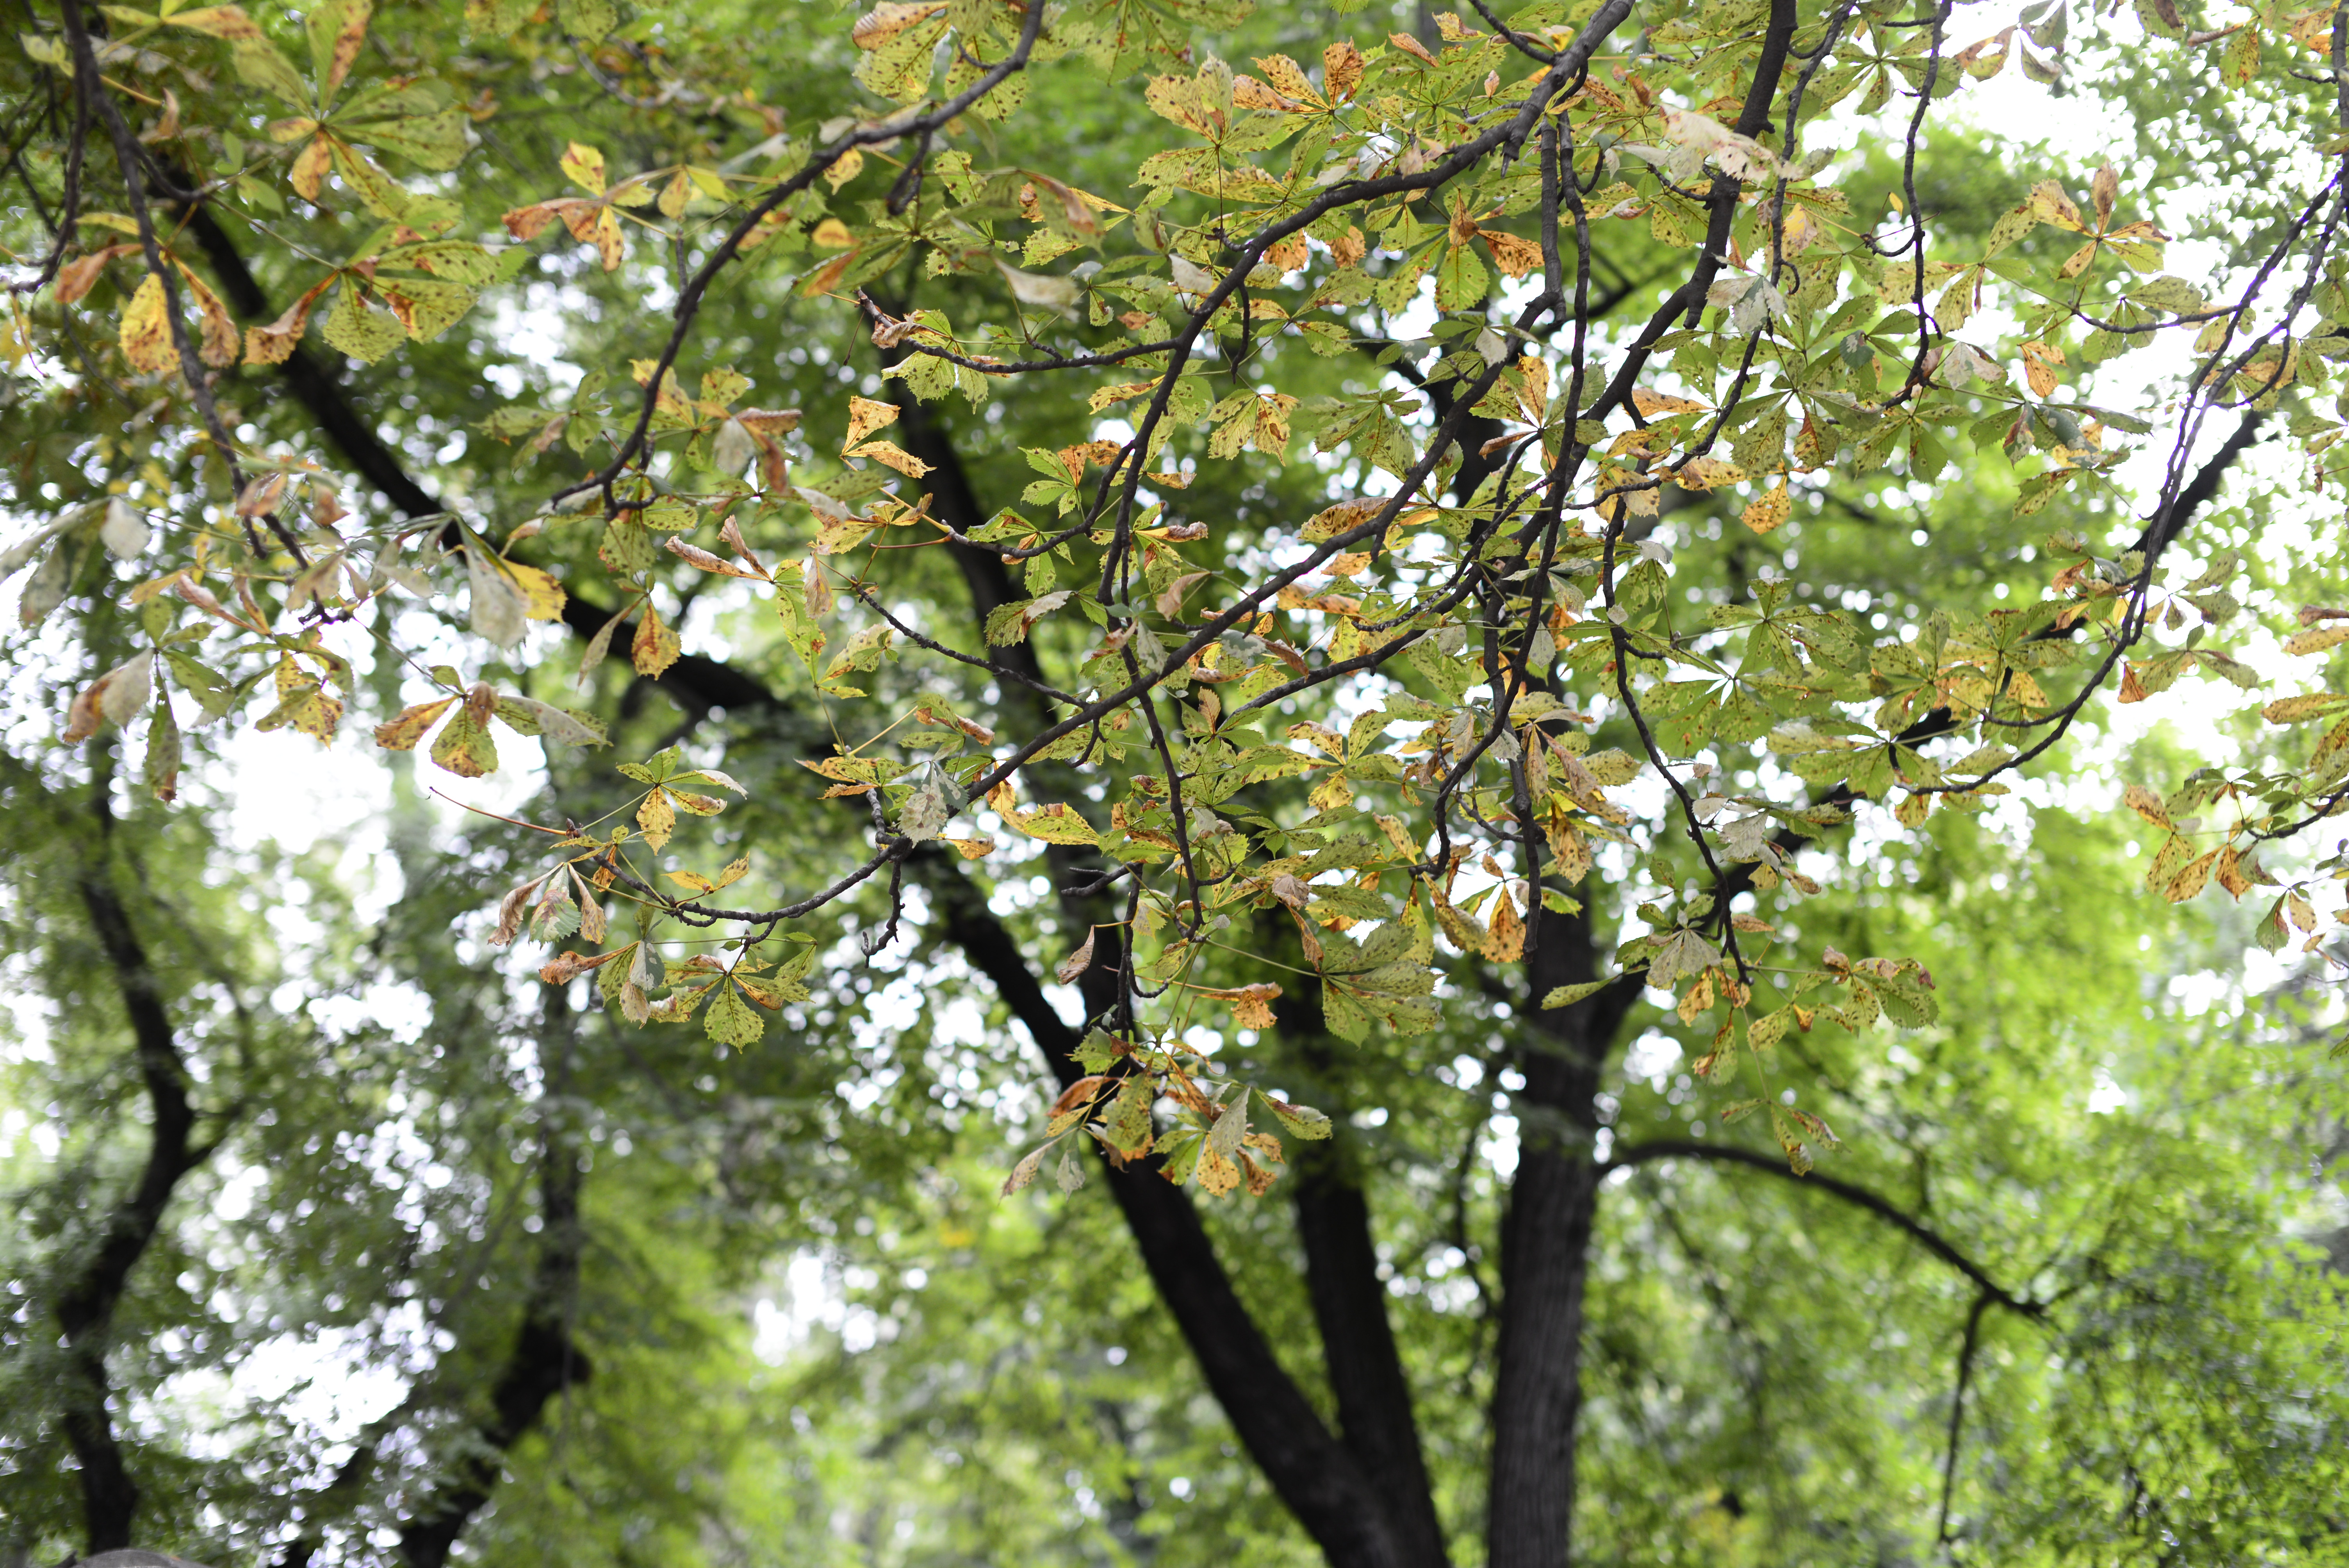
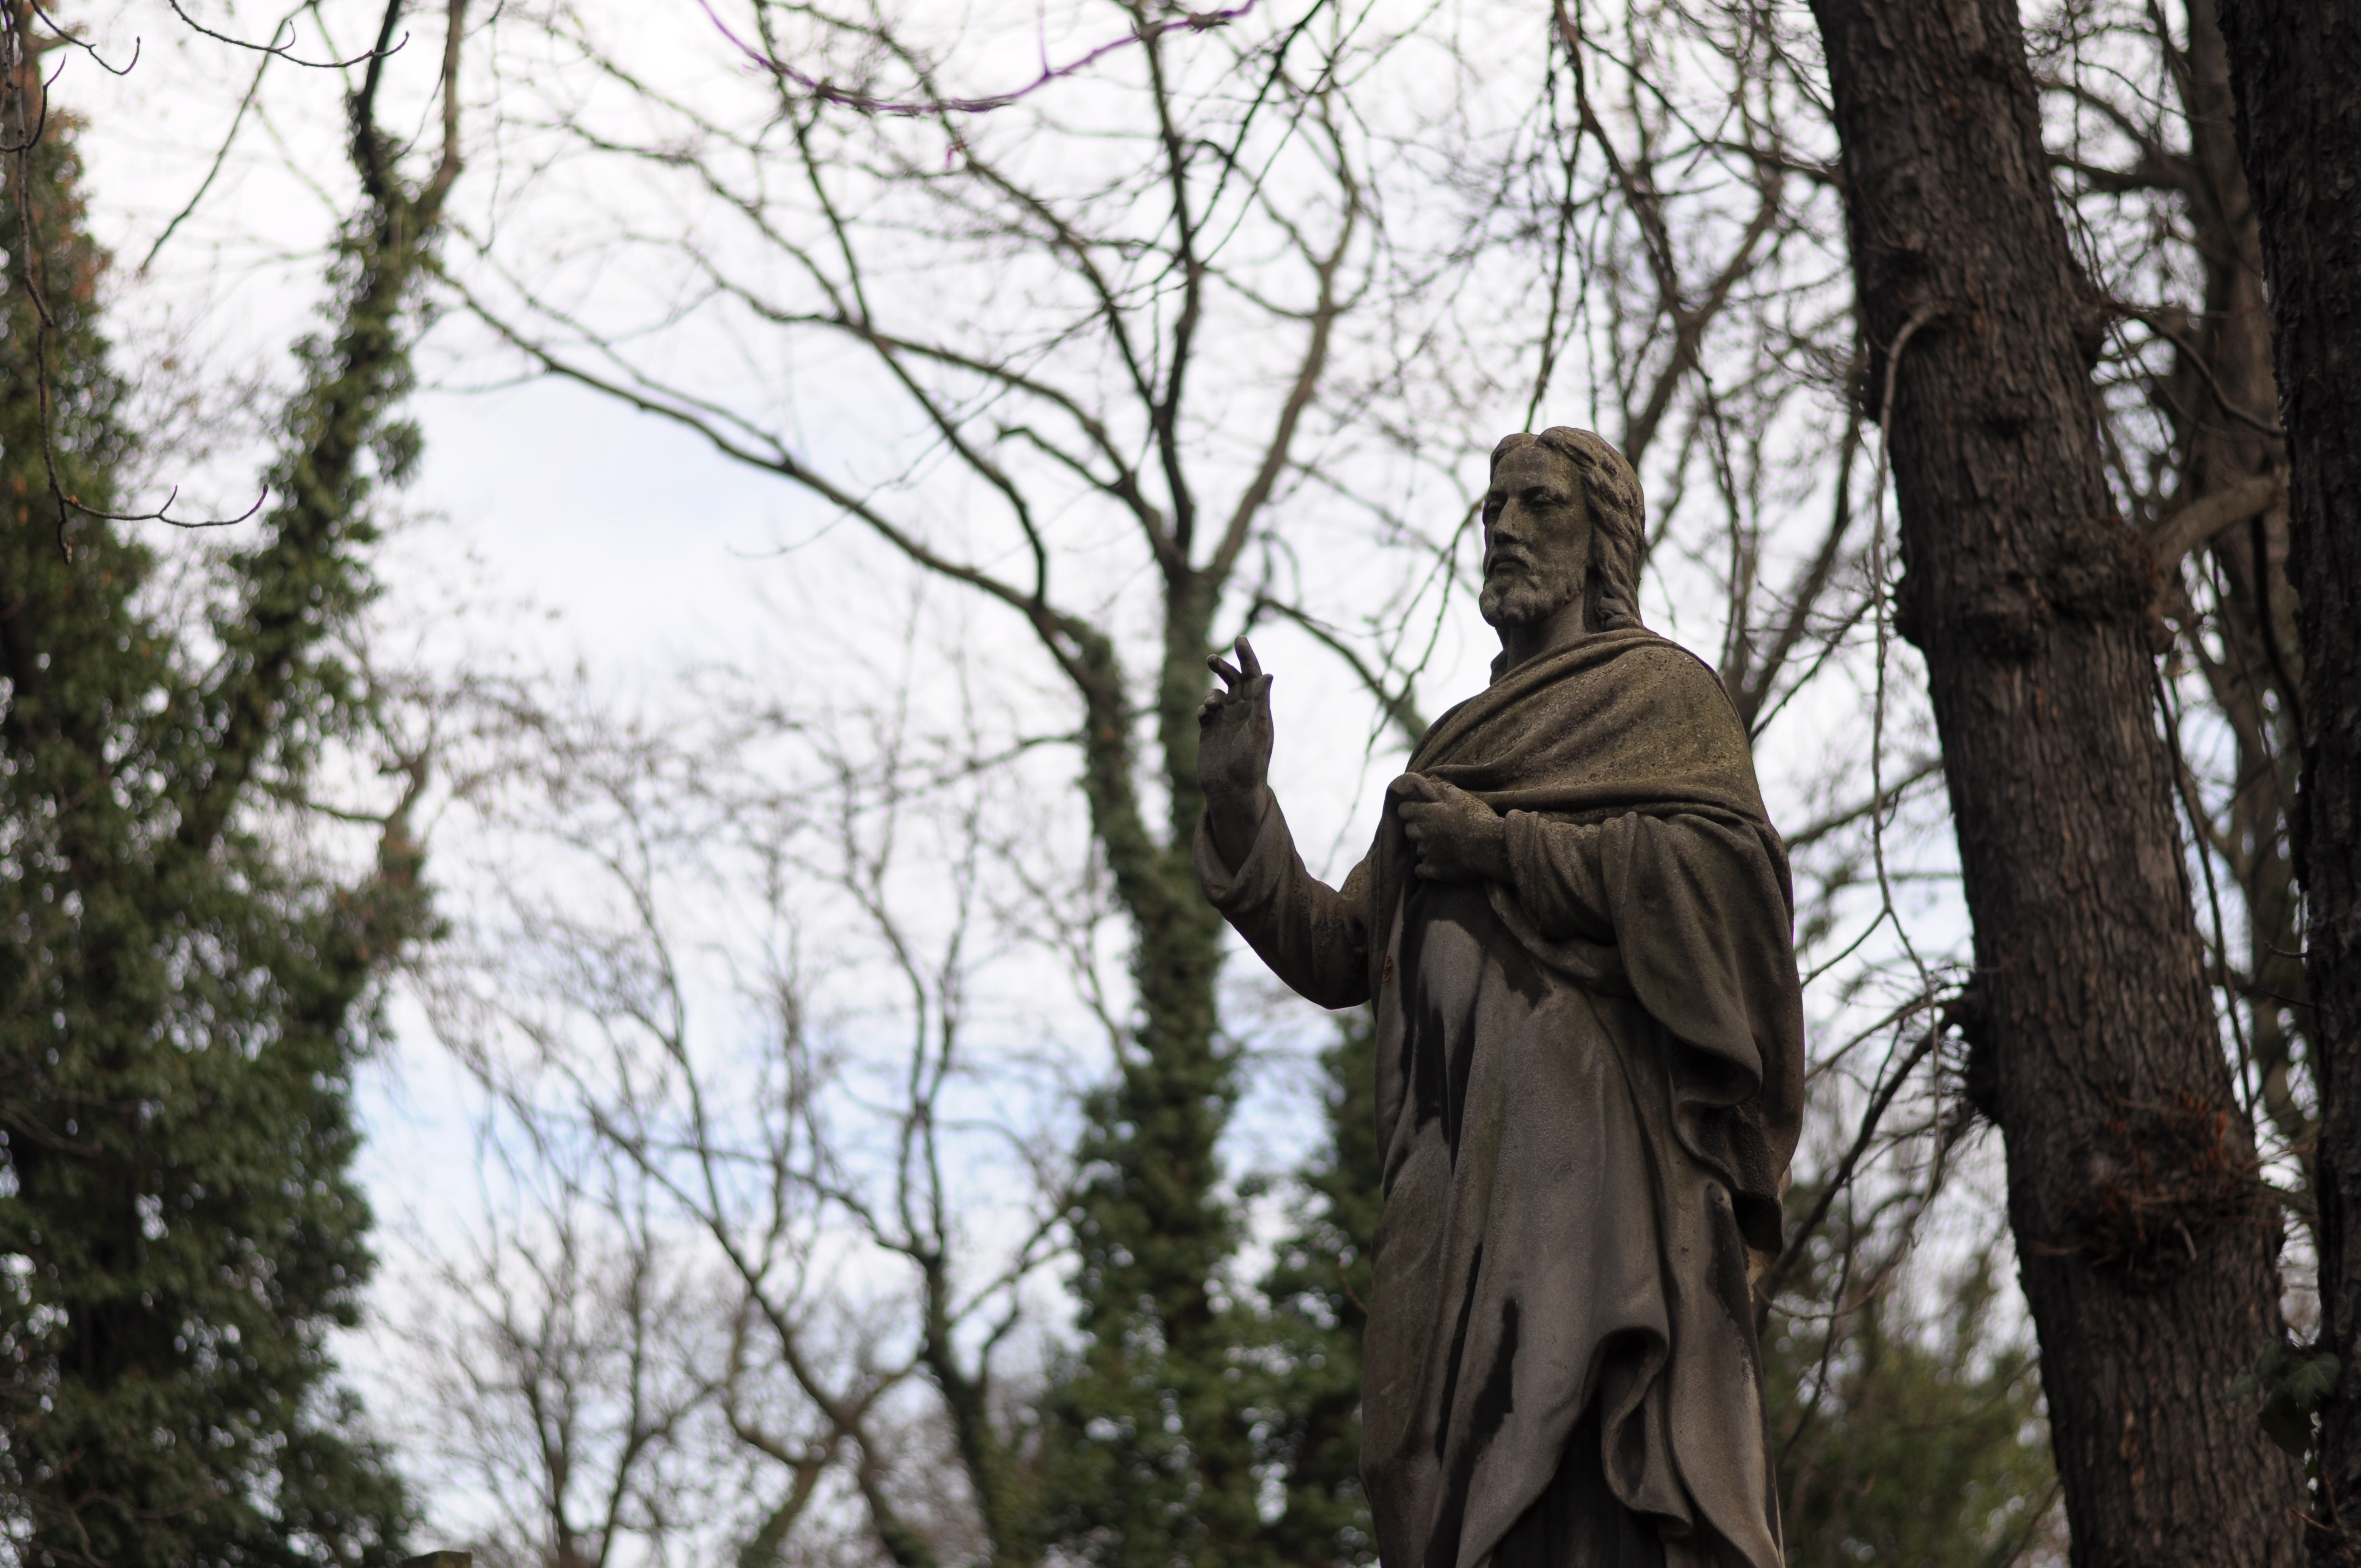
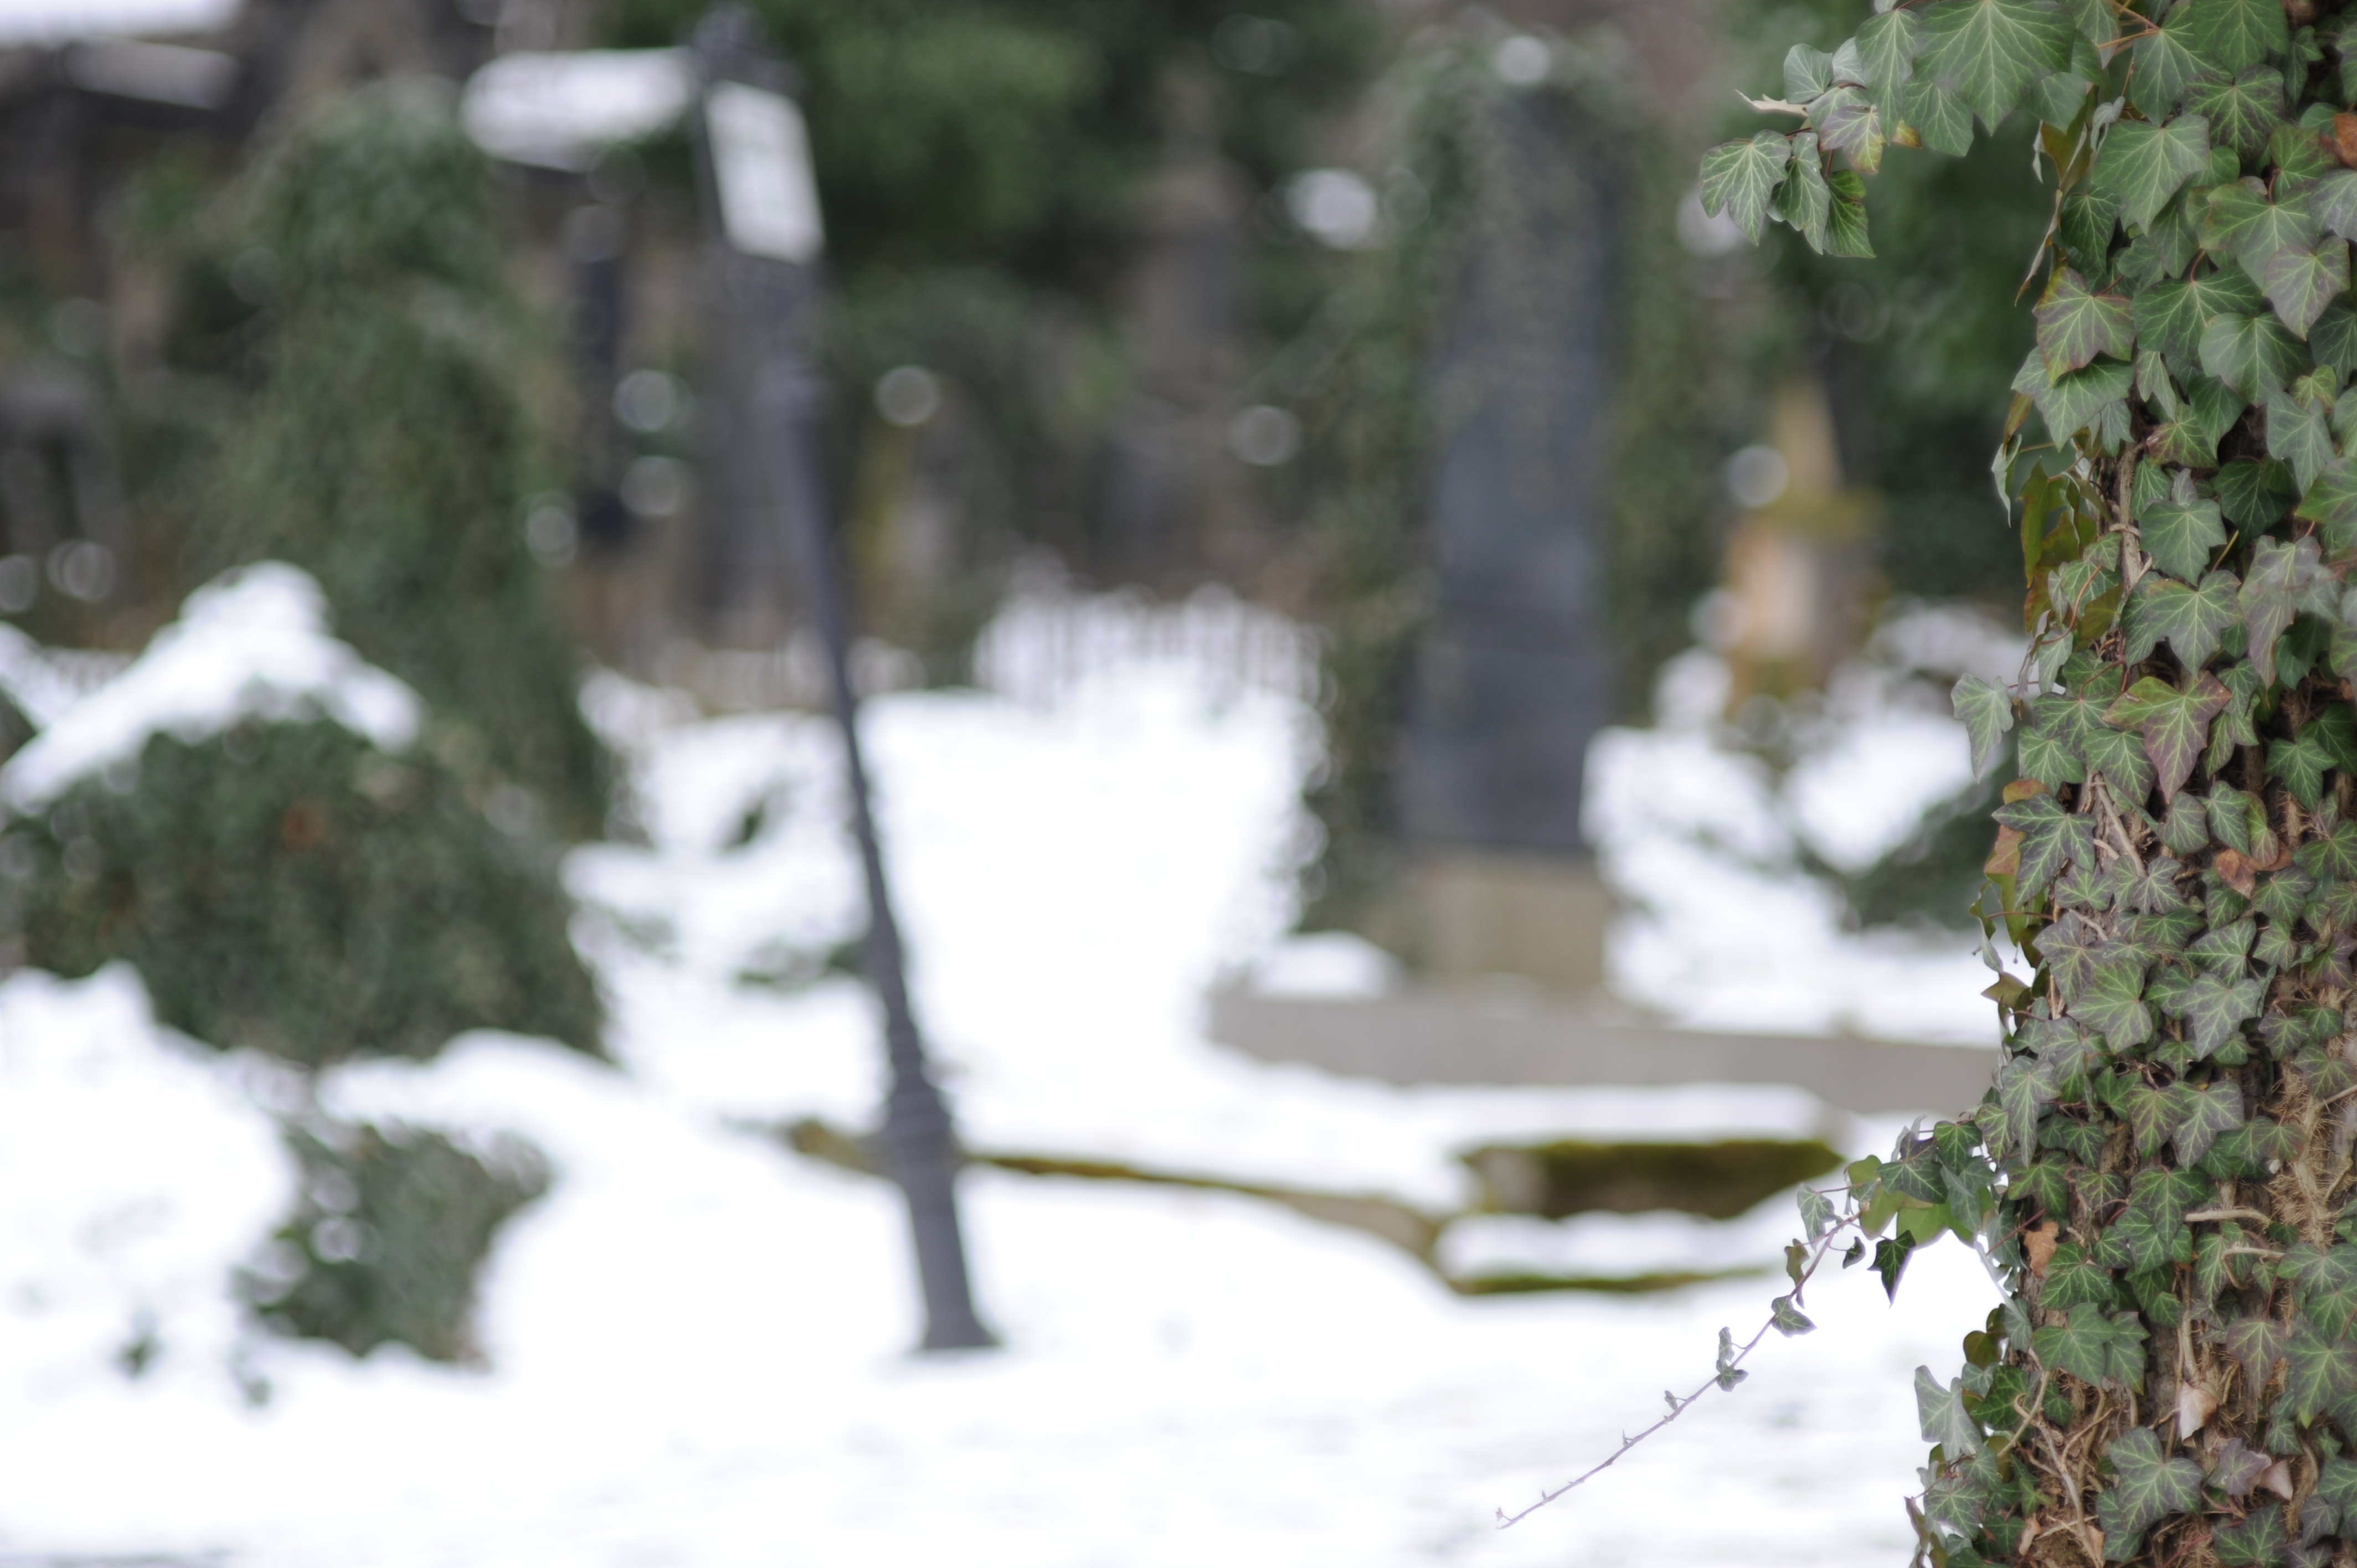
Comparison of Sigma 85/1.4 background (rear) bokeh at shorter
and longer focus distances:

These statues are in my favorite location for photography
practice at the Vinohrady Cemetery in Prague. You can also see
high amount of purple fringing near highlight-dark object for
f/1.4 (left picture), somewhat less for f/2.0 and none for
f/2.8.
Additional bokeh samples of Sigma 85/1.4 using bokeh-test-lines.png with focus distance around 1.4m, on tripod, at
several apertures, Nikon D90:

f/1.4 t=1/20s
f/2.0 t=1/10s
f/2.8 t=1/5s
f/4.0 t=1/2.5s
You can see there is no focus shift. Bokeh is neutral.
Sigma 30/1.4 DC HSM
Samples of Sigma 30/1.4 (this is the one that sold in 2009,
there are newer editions of 30/1.4 lens from Sigma that are
different) which mostly belongs to type 3 - the rear bokeh has
softer edges and front bokeh has more noticeable edges (note:
both pictures are JPGs in portrait picture control with
sharpening value 5 of range 0 to 9):
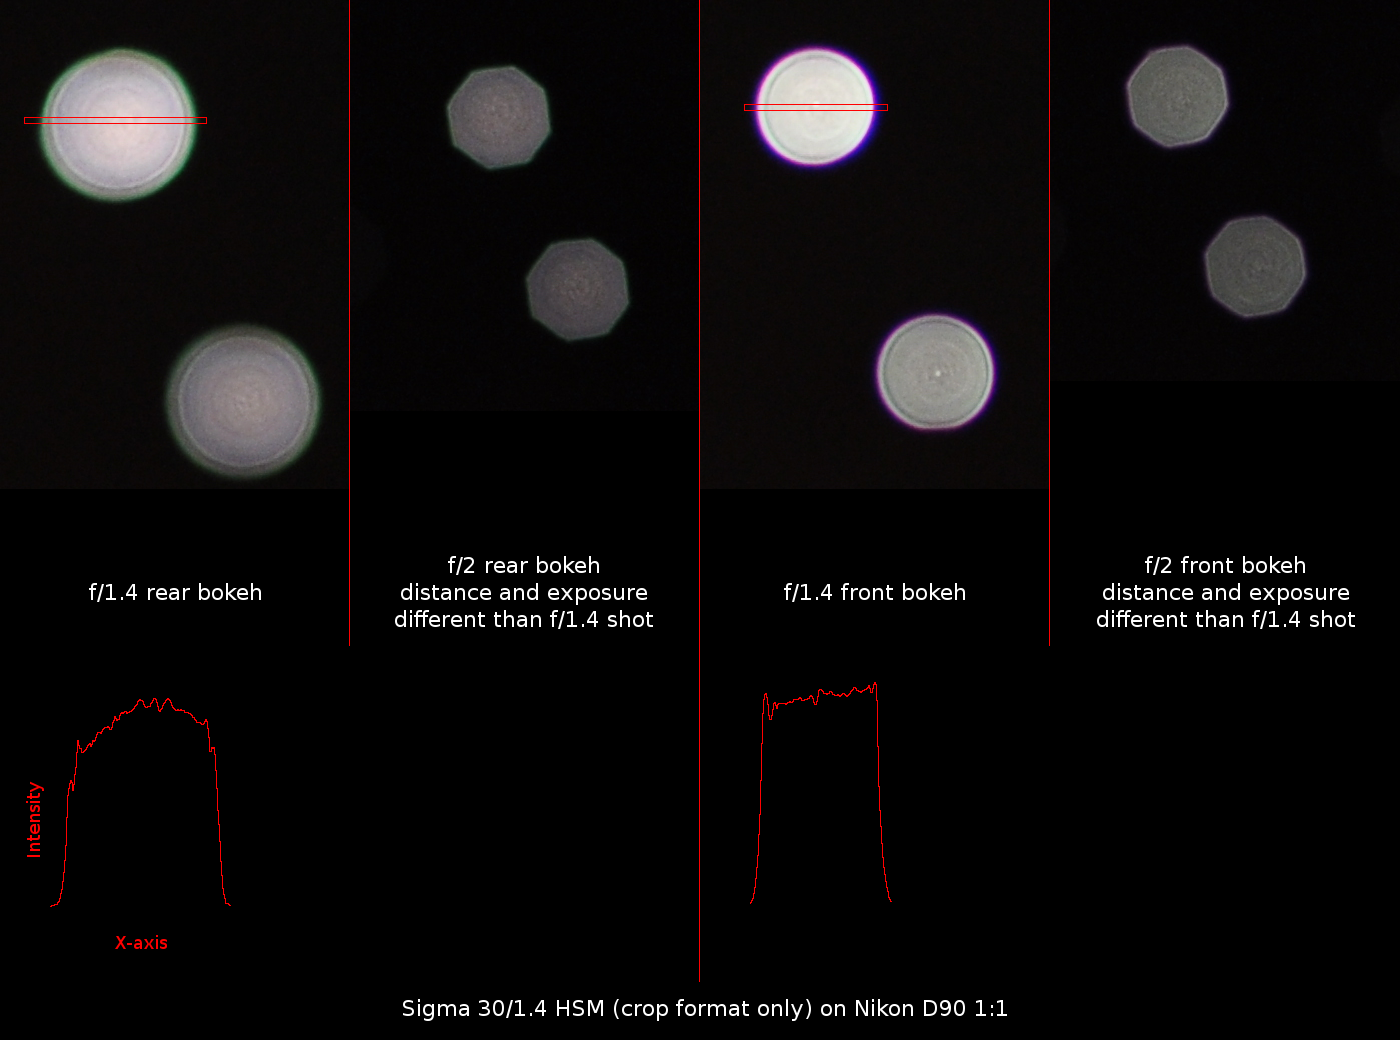
Unlike Sigma 85/1.4 and Sigma 50/1.4, this Sigma 30/1.4 has
noticable polygon bokeh appearance at f/2 due to shape and
position of aperture blades. The aperture blades are slightly
rounded.
Additional bokeh samples of Sigma 30/1.4 using bokeh-test-lines.png with focus distance around 0.7m, on tripod, at
several apertures, Nikon D90:

f/1.4 t=1/20s
f/2.0 t=1/10s
f/2.8 t=1/5s
f/4.0 t=1/2.5s
You can see there is some focus shift, but note that focus ring was not moved during those exposures (and camera was in manual focus mode).
Best focus for f/1.4 is near center of screen, but best focus for f/4 has moved to the left (farther).
Exceptions to above lens types
-
Some lenses may behave same along full range of parameters,
some may be one kind at some apertures / zoom length / focus
distance, and other kind at another. Example: Nikon 50/1.4g
has type 2 at f/1.4, but at f/2 or more closed it is rarely
noticeable, see here: a
comparison of Nikon 50/1.4 (both AF-D and AF-S G) and Sigma
50/1.4.
Other example would be Sigma 85/1.4 which has neutral bokeh at shorter distances and distractive background bokeh at longer distances (say 10m) as can be seen in my sample pictures with statues at cemetery (above). - Minolta/Sony 135 STF lens has a special optical element (apodization element) close to aperture blades that attenuates light going through sides; light in the center is not attenuated. This element allows to convert lens of type 1 into a lens that has both creamy foreground and creamy background bokeh. See here. There are several lenses like that Fujifilm 56/1.2 APD and Laowa 105/2 STF. Apodization is explained in section below.
-
Mirror lenses. Center part of lens when viewed from outside
is obscured by mirror in mirror lenses. This causes bokeh
(both front and rear) to miss center part, creating rings
instead of fully filled circles. This bokeh is often
considered as ugly. I believe there is possibility to have
software solution to analyze such bokeh in picture and
change it to better, filled, shape. I will try to write such
software if I ever get a mirror lens. But that is quite
unlikely as I rarely need long focal lengths.
More about mirror lenses can be found here: http://www.photozone.de/mirror-lenses. - Nikon lenses with DC - the defocus control lenses. There are two such lenses: 105mm f/2 and 135mm f/2. These lenses may be converted between type 2 and type 3 by turning DC ring.
DC lens examples
Defocus Control (DC) is a name which Nikon uses for special lenses that allow to adjust bokeh type through variable correction of spherical aberration. It is a rare opportunity that allows to study transition between lens type 2 (front creamy), type 1 (neutral) and type 3 (rear creamy), all in one lens.
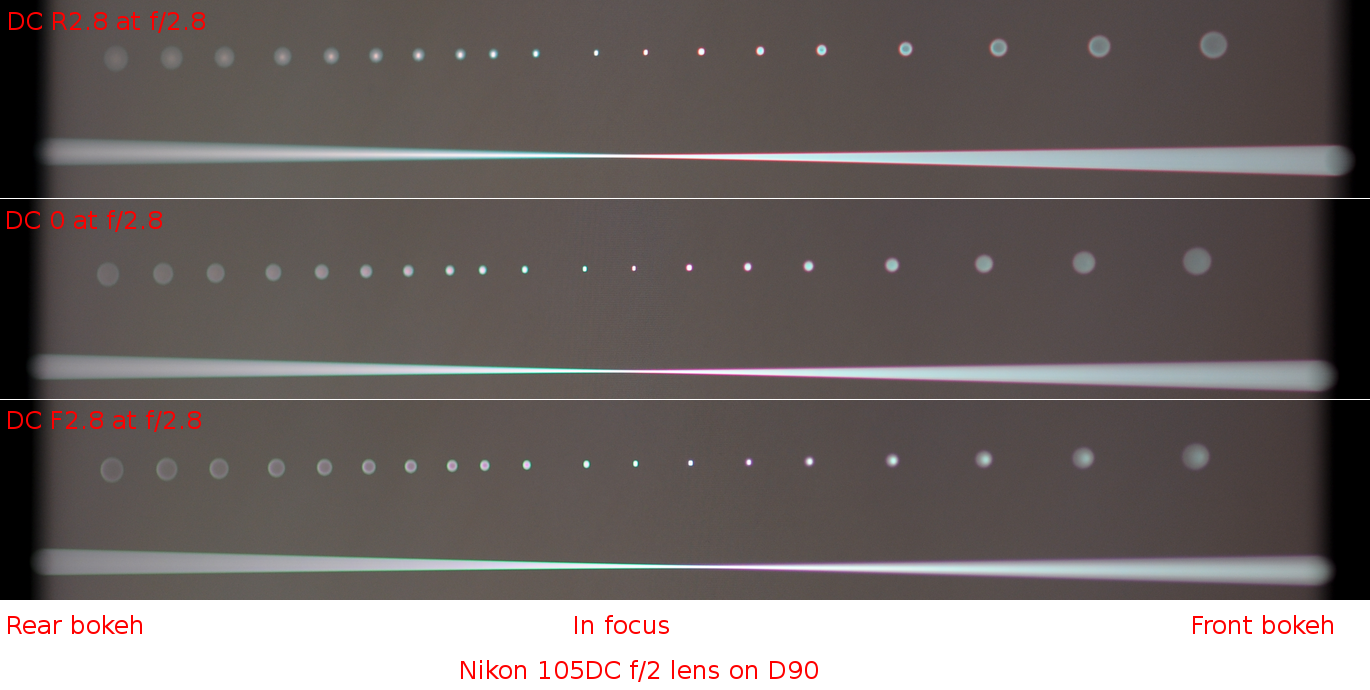
Nikon Nikkor 105 DC f/2
I have tested this lens with usual bokeh-test-lines.png with focus distance around 1.8m, on tripod, at several apertures and several settings of DC ring on Nikon D90. To keep the DC lens sharp, you should not set front/rear ring to higher number than what you use for aperture. If you fail to do, the DC effect will be stronger but image quality will be worse. In table below images that break this rules are marked with star *.
| DC ring position \ Aperture | f/2.0 | f/2.8 | f/4.0 |
|---|---|---|---|
| DC F5.6 | DC-F5.6 f/2.0 * | DC-F5.6 f/2.8 * | DC-F5.6 f/4.0 * |
| DC F4.0 | DC-F4.0 f/2.0 * | DC-F4.0 f/2.8 * | DC-F4.0 f/4.0 |
| DC F2.8 | DC-F2.8 f/2.0 * | DC-F2.8 f/2.8 | DC-F2.8 f/4.0 |
| DC F2.0 | DC-F2.0 f/2.0 | DC-F2.0 f/2.8 | DC-F2.0 f/4.0 |
| DC 0 neutral | DC-neutral f/2.0 | DC-neutral f/2.8 | DC-neutral f/4.0 |
| DC R2.0 | DC-R2.0 f/2.0 | DC-R2.0 f/2.8 | DC-R2.0 f/4.0 |
| DC R2.8 | DC-R2.8 f/2.0 * | DC-R2.8 f/2.8 | DC-R2.8 f/4.0 |
| DC R4.0 | DC-R4.0 f/2.0 * | DC-R4.0 f/2.8 * | DC-R4.0 f/4.0 |
| DC R5.6 | DC-R5.6 f/2.0 * | DC-R5.6 f/2.8 * | DC-R5.6 f/4.0 * |
Sample picture based on few entries from table above:
- Comparative pictures with DC rear and front: http://www.kalop.eu/Nikkor-DC_EN.php
- An interactive tool for DC effects (unfortunately there are no objects in foreground) in SLR Gear Lens review: http://www.slrgear.com/reviews/showproduct.php/product/101/cat/12
- Video with rear DC to front DC transition (Nikon Help Hotline channel; not affiliated with Nikon): http://www.youtube.com/watch?v=ZFC7CdL6d6Q#t=01m50s
- Another comparison of DC effects: http://www.stacken.kth.se/~maxz/defocuscontrol/
- Excellent comparison shots with clearly visible DC effects in this 135 DC review on Nikonjin forums: http://www.nikonjin.com/forum/showthread.php?tid=1043
Some notes
- Certain backgrounds look great with any lens.
- If you use in-camera sharpening or sharpen in post processing, you may also add edges to bokeh rings. Especially if you overdone it. Solution is to sharpen selectively.
- Bokeh can get worse with filters. Here a user on reddit shows how his Canon EF 300/4L USM with cheap $30 UV filter has much worse bokeh than without.
- Some aberrations cause bokeh circle edge to be of different color. Example is in my samples of Sigma 50/1.4 above. Solution: learn black and white photography ;-)
- Typical backgrounds that cause problems when rear bokeh has pronounced edges are trees with bright sky behind. Few random images found on Flickr (not saying that they are bad, they just illustrate the idea, actually they are quite good): Random 1 Random 2 Random 3
- A lot of people don't care about bokeh character ;-)
- Strong image will be strong regardless of bokeh.
- If your lens cannot make it (the bokeh you like), you can fake it.
- You can also fit custom obstructions in front of lens that will affect bokeh.
Apodization element/filter
Apodization (or apodisation) refers to literally cutting the foot. In optics, it has meaning that sharp transition at bokeh edge is modified. And this modification does not rely on spherical aberration (that is already explained in sections above) thus it does not share disadvantage that under- or over-corrected SA has on sharpness of focused image parts. You can imagine Apodization as aperture blades that would be partly translucent near edge so that there would be a smooth transition. Now I have not seen a lens with partly translucent aperture blades yet. But there are other ways to get this using an apodization lens element or an apodization filter with limitation that it would work best only at largest aperture as the effect will not adapt when the lens is stopped down. In past, only well known lens of this type was Minolta/Sony 135 STF f/2.8 t/4.5 (with apodization element). See here and here. Since fall 2014 there is a Fujifilm XF 56/1.2 APD with apodization filter. Note that Apodization filter/element does not play well with phase detect AF so the 135STF is manual focus and the Fujifilm 56APD focuses in contract detection only (even if camera has phase detect on sensor). And since spring 2016 there is a Laowa 105 STF (f/2 with t/3.2 transmition) that has apodization element.
Apodization filter is a filter placed near aperture blades
that is clear in center and gradually darker on sides. It can
be made from glass, film or other plastics. I guess it is
possible to convert any lens to STF type by including an
apodization filter. Best placement is next to aperture blades.
Placing such filter on front element may work with long faster
lenses, but it will cause high vignetting too. Sample
vizualization (Apodization filter has yellow color):


If you have successfully converted non-STF lens into STF,
write me an email - I will link to your blog about that.
Here is a page of Markus Keinath who has been experimenting with various Apodization filters on different lenses and sent me email with link to his page:
http://www.4photos.de/camera-diy/Apodization-Filter.html
Apodization lens element is concave lens that is not made from a clear glass, but rather from kind of gray tinted glass. Rays going through center of this lens element will be attenuated only a bit, but rays going through side will attenuate their light a lot. So effect is same like apodization filter, but it has different set of advantages and disadvantages in terms of lens design compared to buit-in filter.
Note that I have seen some claims that Apodization element/filter creates Gaussian profile of bokeh (like Gaussian blur effect in image editors) and that this bokeh is too smooth. I don't think that it has to be that way. In case of filter, the profile of attenuation transition is a design choice. Also once you stop down the lens a bit, you will get different profile, so even if at some apertures the effect is like the Gaussian filter, when lens is stopped down the bokeh will be less smooth.
There is also a way to simulate Apodization filter by using either multiple exposures with different apertures or by changing aperture during exposure. It is described below.
Apodization - Do it yourself
Do it yourself? I plan to test this, but I have not done it yet. Check this article after few weeks to see if I’m successful with that.
So how to do it? There are several design choices for DYI modification:
- 1. How are you going to get graduated radial ND filter?
- 2. Where are you going to place it?
Get filter
The first issue is that radial ND filters are not common. Fujifilm marketing talks about nanotechnology stuff “The built-in APD filter, the pinnacle of Fujifilm's nanotechnology, produces even smoother bokeh, making the subject stand out even more and enhances creativity, not only for portraits, but also on a wide range of other subjects.” That does not sound like you could ever make that good APD modification, right? After all Fujifilm sells the APD version for 500 USD more (and that is for regular price, non-APD has often some discounts). Never mind, read on.
The Minolta/Sony 135 STF f/2.8 t/4.5: It does not have filter, it has concave element that is made from “grey” glass. If a ray goes through center, it goes through less thickness thus less attenuating part. If a ray goes through side, it goes through more thickness thus more attenuating part. So that is a nice graduated radial ND filter and a lens in one (actually in 135 STF it is doublet with both air-glass surfaces being flat). Laowa 105 STF is similar. Not an option for DIY solution either.
I know about Marcus Keinath who has successfully converted some manual lenses by adding a APD filter made of appropriately exposed and developed negative film. Read about it here. He also writes, that APD filters can be ordered from here. But I guess they don’t sell them in small quantities with reasonable prices.
Anyway, adding a layer of glass or film with that APD filter is going to affect some optical properties of lens (see here). You may lose some sharpness, especially for big aperture lenses where this modification make most sense.
I don’t have a film stock nor film camera so I decided to pursue different way. My idea is to use a smoke to darken part of lenses. Yes, lenses directly - no additional glass surface added. Will work? I don’t know yet. I have just tried to smoke with candle over a glass bottle and it created nice ND gradient. I don’t have reliable smoke source yet and setup that could produce evan smoke layer around the lens element. Candle smoke only happens when burning is incomplete. The black smoke that deposited on the bottle is not permanent, it can be cleaned almost completely by fingers. So there is a chance that if you do it wrong you can clean lens and start over. There may be some interaction with coatings though. Is deposited smoke fine enough? I don’t know yet.
Where to place it?
Best place is exactly where aperture is. You can certainly remove it and place some filter there at cost of not having aperture ring. This may sound bad, but apodization will be best visible only when lens is wide open so you will be likely to use it there. Also apodization will reduce T-stop so if you have just slight issues on bright day with highest shutter speed and lowest ISO at maximum aperture, it may work a bit better after conversion.
Other compromise is to just place it next to the aperture. It won’t be as good as it can be, but it will make bokeh better. Fujifilm just did that with 56/1.2 APD lens. It has one extra filter. So what is the compromise?
Look at the diagram that shows how light passes through lens. Since I plan to modify Nikon 50/1.8G, this is approximate diagram of it. Rays are just hand-drawn without much accuracy. If you want to see some better diagrams, Pierre Toscani has best visualizations of lenses that I have seen. But he does not describe bokeh effects which are of interest here.
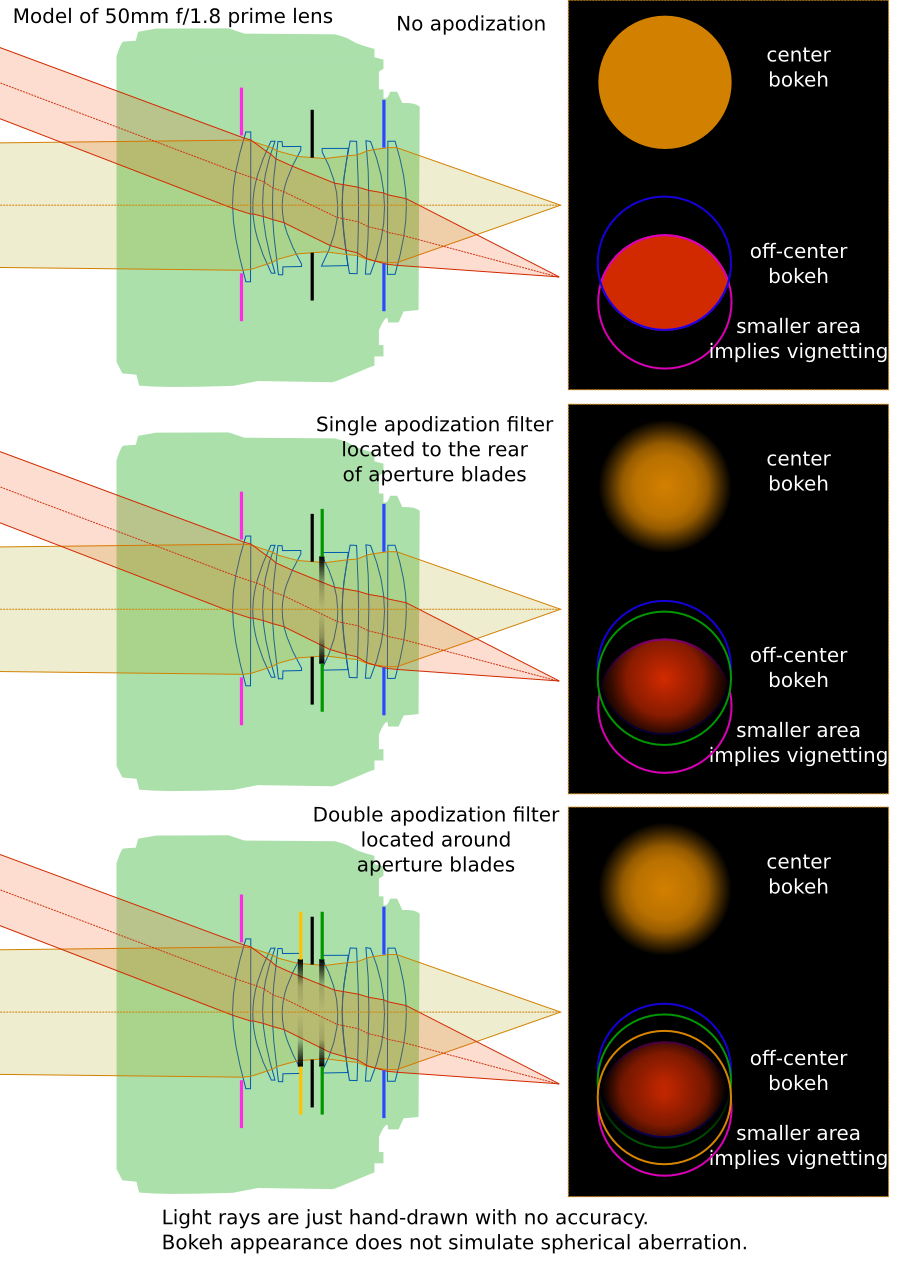
You can see that one apodization filter is not enough for most smooth bokeh outside of picture center. One side is smooth but other is not. You can certainly see this in pictures of Fujinon 56 f/1.2 APD here: http://www.randallcipriano.com/2014/12/the-real-difference-xf56-vs-xf56-apd-vs-ff/ and here: http://ivanjoshualoh.wordpress.com/2014/12/13/apd-the-new-king/. On the other hand, I have not seen that in Sony 135 STF. In fact Sony 135 STF is still king of apodization even when compared to newer Laowa 105 STF. You can see it in this comparison. When you look at apodization elements in both lenses in becomes obvious that a profile that Laowa uses is not strong (light going through sides goes through about 2x thickness than light going through center while Sony 135 STF has almost zero thickness in center of apodized element so it can be made from quite dark glass. Laowa seems to have quite bussy bokeh on grass samples in the comparison so I guess the amount of apodization is too weak to attenuate aberrations that affect bokeh. But there is still nice effect on infinity (where SA effect is weak when focusing close).
It is clear that double apodization will be better. Since I plan to apply smoke on lens surfaces, I can apply that on both lenses around aperture. Like here:

So check this article out in few weeks (or rather years - I did not have time to pursue this further since fall 2014 when I written this part originally) to see what I got in my DIY apodization test. Be aware if you attempt to do this that you will likely lose autofocus and it is quite easy to destroy a lens. So starting with some cheap and manual lens is a good way to go.
In last few years the Fuji with new APD design sparked a new interest in doing apodization of lenses in DYI way. Here are few links:
- Apodizing a filter using smoke from lighter - very similar way (applying smoke) to what I have proposed above.
- There is a Flickr group dedicated to DYI apodization.
- Jun Yeu Mah has tried clear sticker painted on sides (worked well on bokeh, but reduced image quality), an elaborate setup for dye painting a filter which was ultimately not used beacuse liquid would flow down and paint brush on a filter.
Outdoor bokeh comparisons
Comparison of Sigma 30/1.4, Sigma 50/1.4, Nikon 50/1.4 on DX and FX
I have taken my Nikon D90 (DX - APS-C frame) and friend's Nikon D3 (FX - full frame) with three prime lenses to Vinohrady cemetery to evaluate their background bokeh. There were two FX lenses: Sigma 50/1.4 DG HSM, Nikon 50/1.8G AF-S; and one DX lens: Sigma 30/1.4 DC HSM. Pictures are jpegs converted by ViewNX in Standard picture mode and each series has fixed white balance. Aperture ranges from wide open to f/4 in four steps.
Position of tripod was fixed, but cameras have different height between mount and bottom plate so there is some change, also while both Sigma 50 and Nikon 50 are marked as 50mm, the Sigma is about 46mm Nikon is slightly longer at 52mm.
Open a few of them in new browser tabs (middle size is enough for bokeh comparisons) and switch between them to compare.
Series 1
Series 1 full album - focus distance around 5m.
Here are links to middle size pictures:
| DX Sigma 30/1.4 | f/1.4 | f/2.0 | f/2.8 | f/4.0 |
|---|---|---|---|---|
| FX Nikon 50/1.8G | f/1.8 | f/2.2 | f/2.8 | f/4.0 |
| FX Sigma 50/1.4 | f/1.4 | f/2.0 | f/2.8 | f/4.0 |
| DX Nikon 50/1.8G | f/1.8 | f/2.2 | f/2.8 | f/4.0 |
| DX Sigma 50/1.4 | f/1.4 | f/2.0 | f/2.8 | f/4.0 |
Series 1
Series 2 full album - focus distance around 1.5m.
Here are links to middle size pictures:
| DX Sigma 30/1.4 | f/1.4 | f/2.0 | f/2.8 | f/4.0 |
|---|---|---|---|---|
| FX Nikon 50/1.8G | f/1.8 | f/2.2 | f/2.8 | f/4.0 |
| FX Sigma 50/1.4 | f/1.4 | f/2.0 | f/2.8 | f/4.0 |
| DX Nikon 50/1.8G | f/1.8 | f/2.2 | f/2.8 | f/4.0 |
| DX Sigma 50/1.4 | f/1.4 | f/2.0 | f/2.8 | f/4.0 |
What I see in both series is that Sigma 50/1.4 DG HSM has most smooth bokeh in background out of the three wide open, especially in APS-C subframe. On sides in full frame, the bokeh of Sigma 50 has slightly pronounced edges and it is more of triangle shape. Sigma 30 also has this triangle bokeh on sides, but even in its limited APS-C frame there is a lot of it.
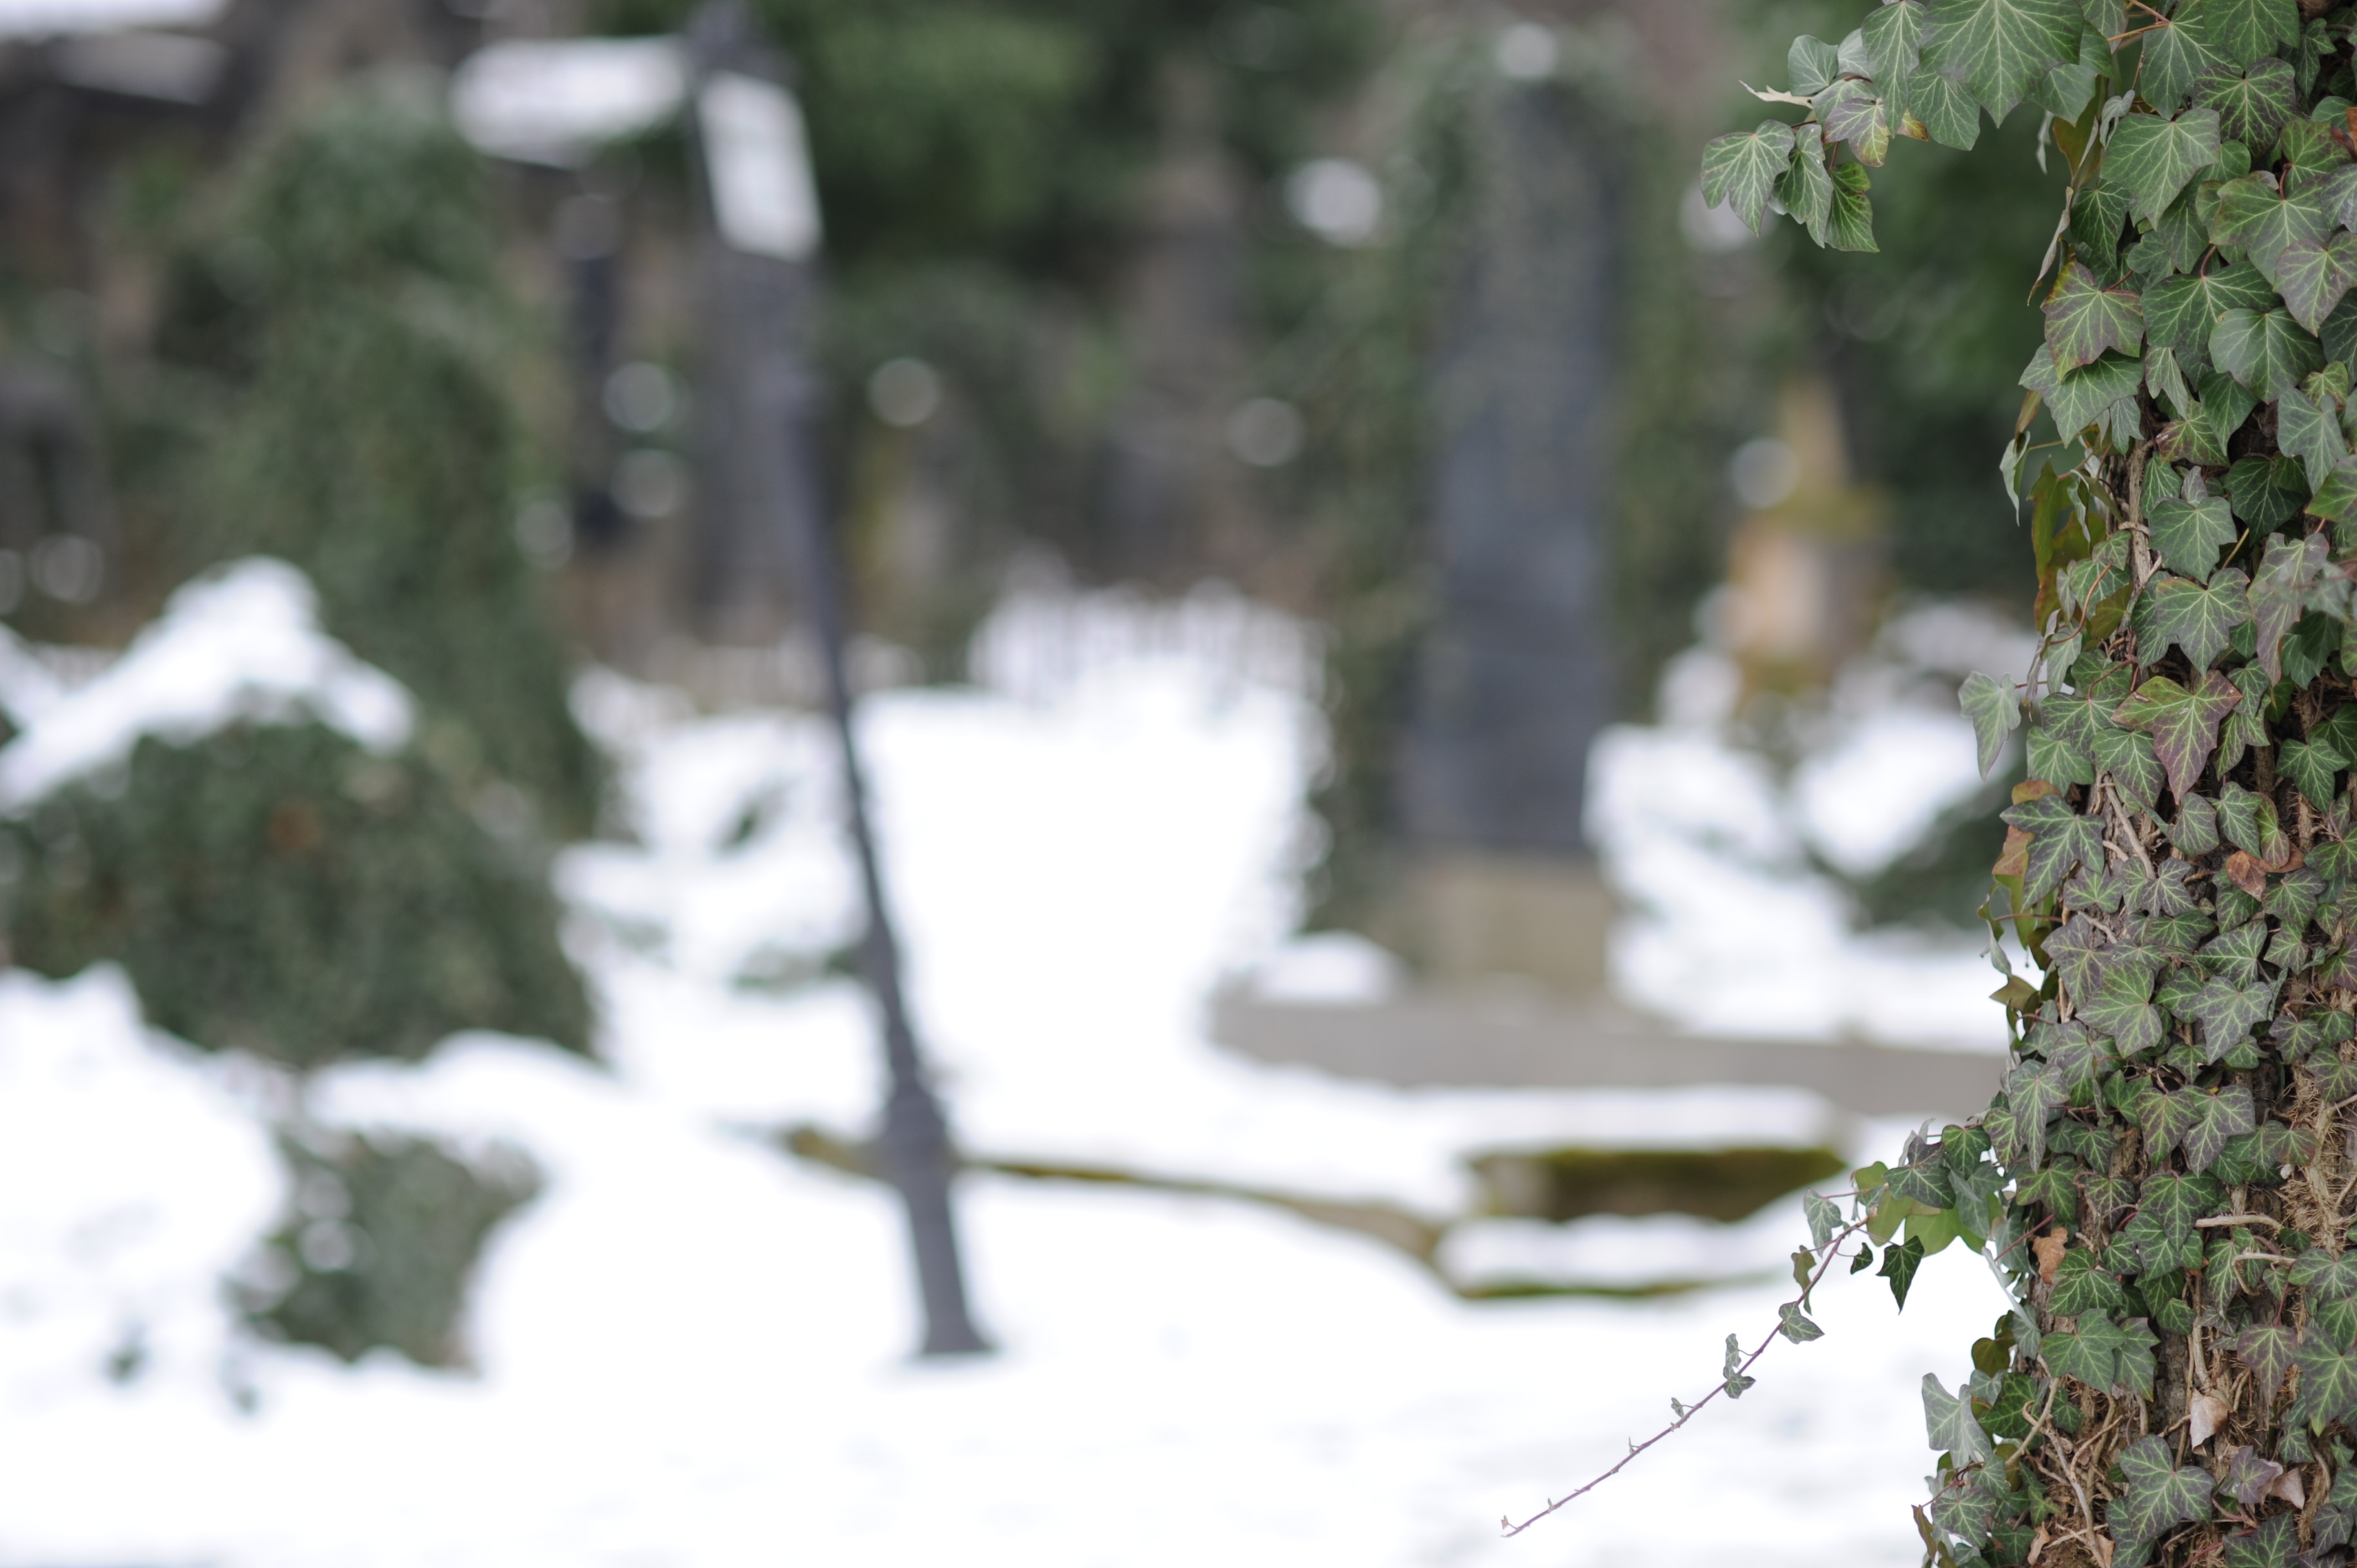
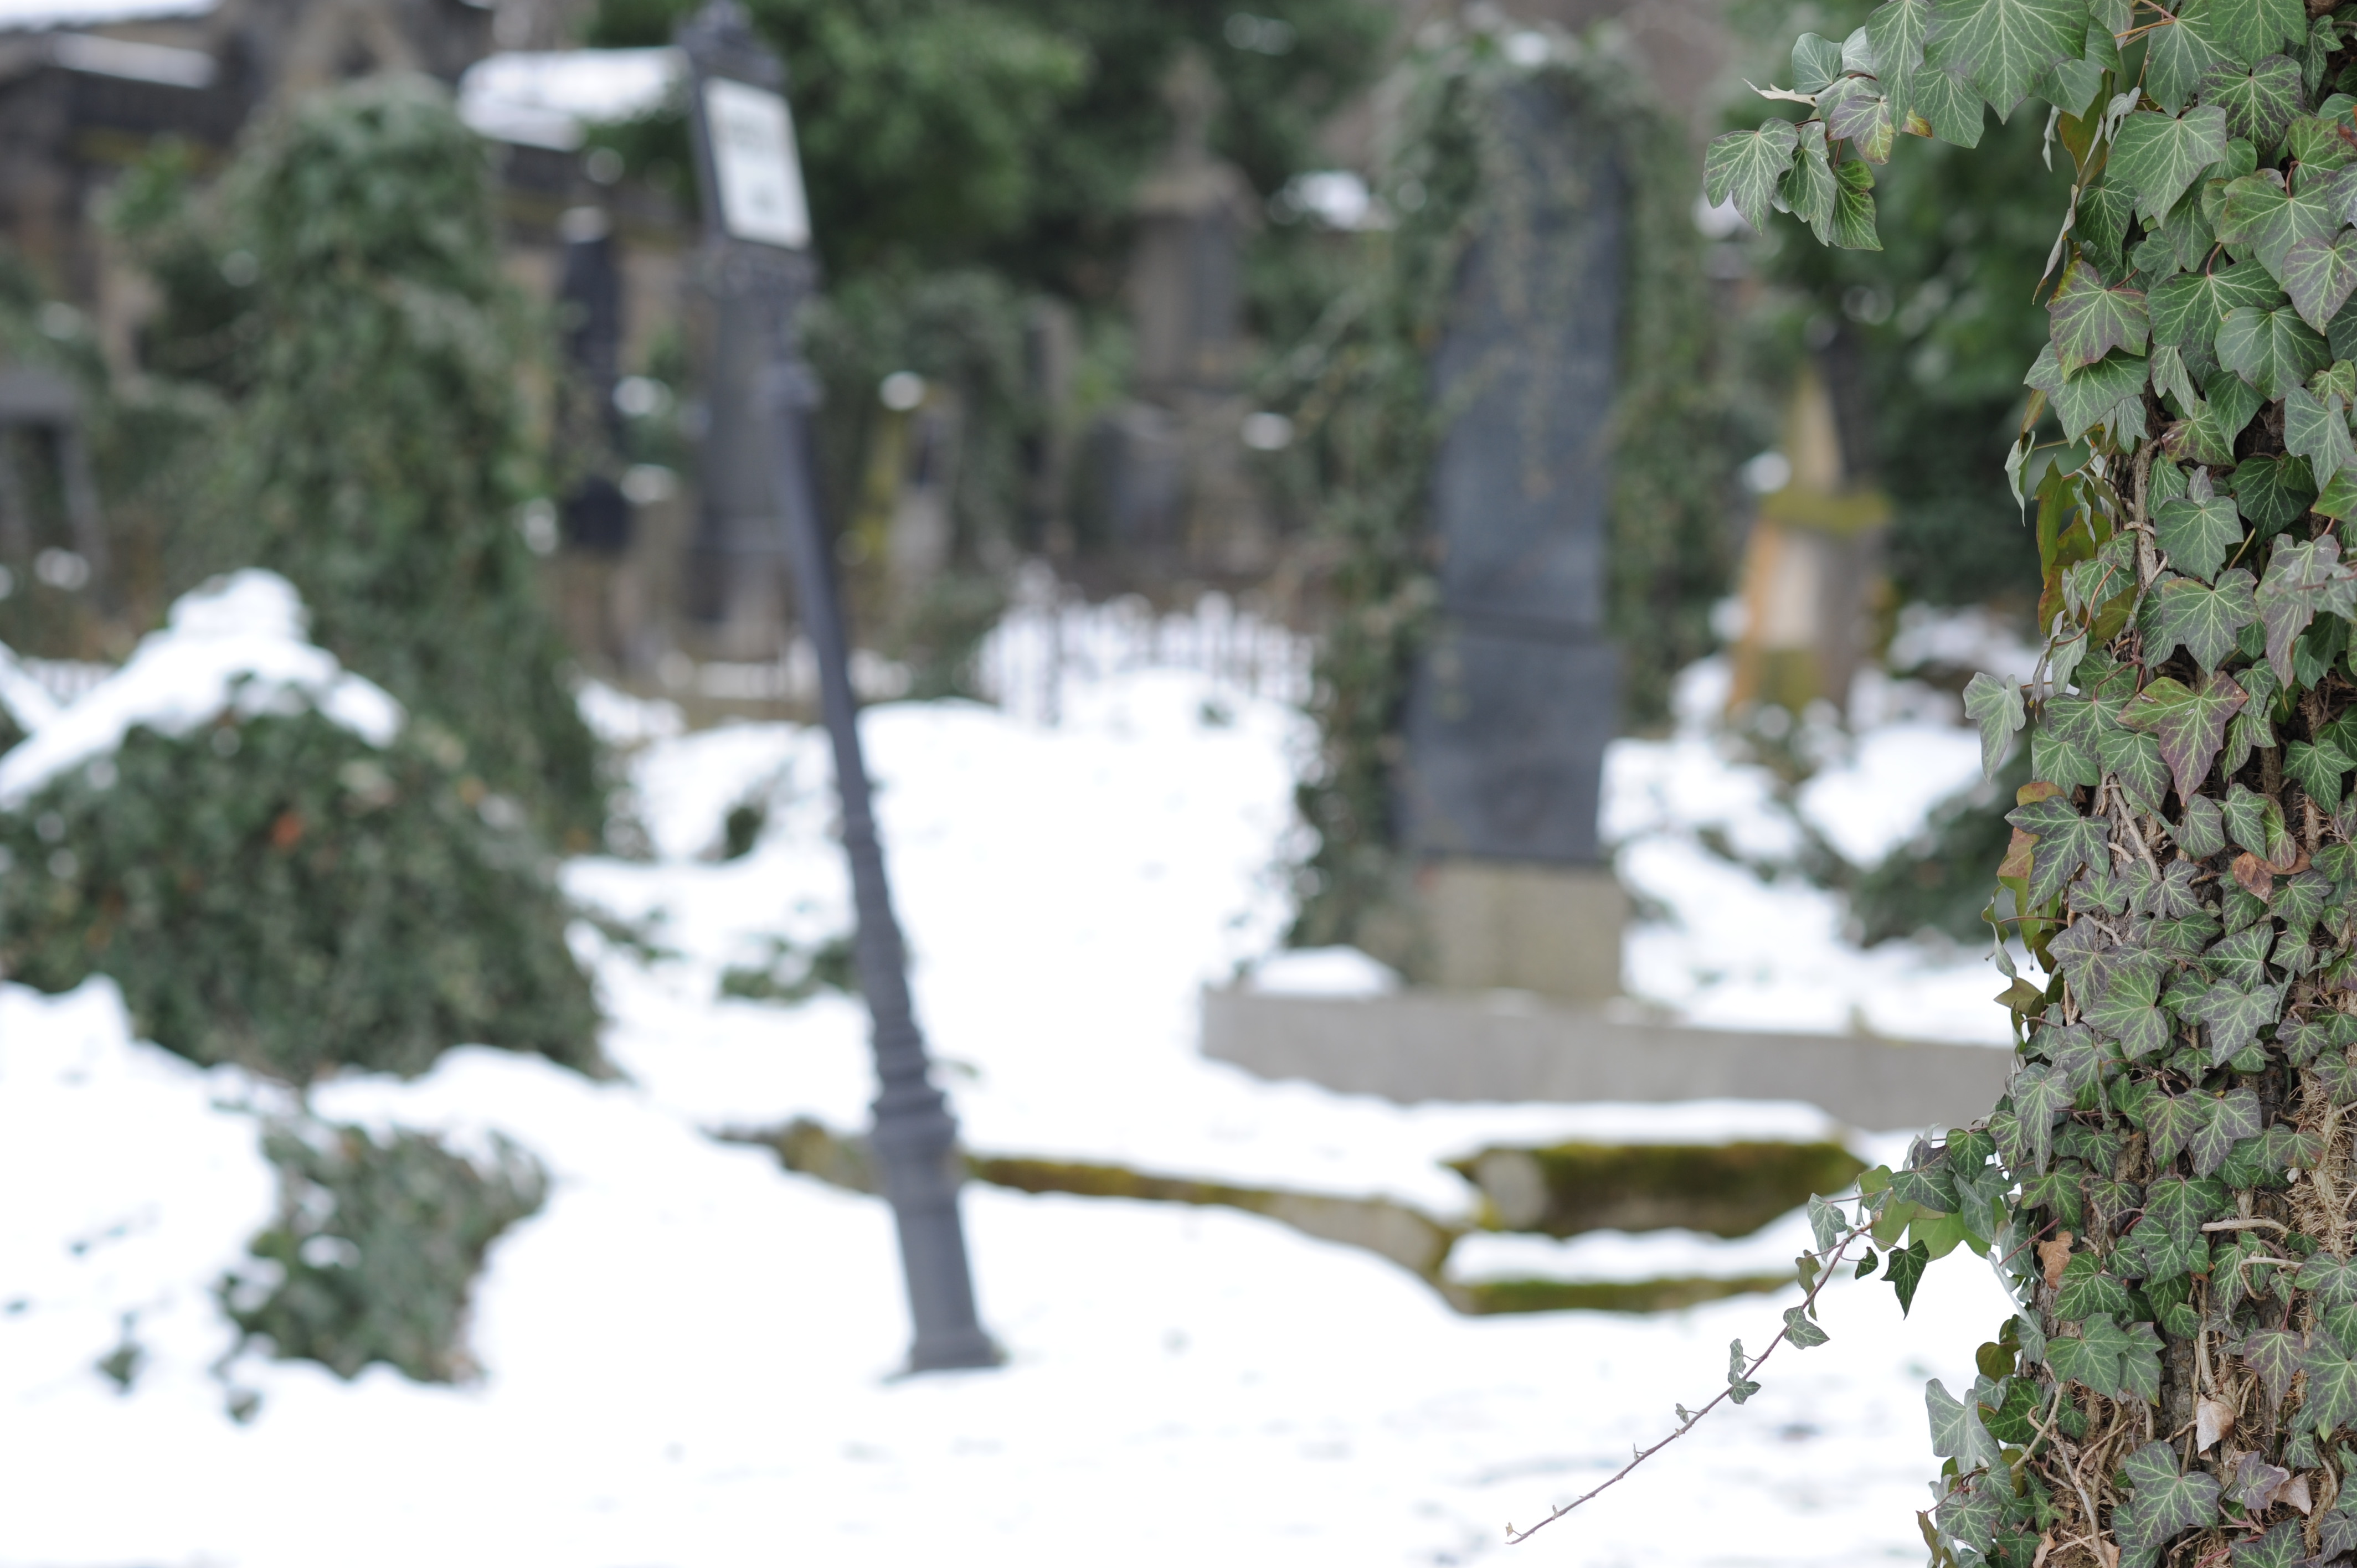
Comparison of Sigma 85/1.4 and Nikon 105DC f/2 on FX
I have taken friend's Nikon D3 (FX - full frame) with these two lenses prime lenses to Vinohrady cemetery to evaluate their background bokeh. Pictures are out of camera jpegs standard picture mode, ISO 200. Aperture ranges from wide open to f/5.6 in four or five steps. Camera was on tripod and used with delayed exposure. Each line in table below was focused wide open and for particular DC value using AF in Live View (on the leaves on the right side) then switched to MF and exited Live View. Exposure was manual.
| Lens + setting \ Aperture | f/1.4 | f/2.0 | f/2.8 | f/4.0 | f/5.6 |
|---|---|---|---|---|---|
| Sigma 85mm | f/1.4 | f/2.0 | f/2.8 | f/4.0 | f/5.6 |
| Nikon 105 DC front 4.0 | f/2.0 | f/2.8 | f/4.0 | f/5.6 | |
| Nikon 105 DC front 2.0 | f/2.0 | f/2.8 | f/4.0 | f/5.6 | |
| Nikon 105 DC neutral | f/2.0 | f/2.8 | f/4.0 | f/5.6 | |
| Nikon 105 DC rear 2.0 | f/2.0 | f/2.8 | f/4.0 | f/5.6 | |
| Nikon 105 DC rear 4.0 | f/2.0 | f/2.8 | f/4.0 | f/5.6 |
Samples based on pictures from above table:

As expected, the DC has most effect outside of range recommended for best sharpness. Bokeh of Sigma wide open is very close to Nikon at f/2 with DC set to R2. Nikon at f/2 DC neutral a bit less smooth than Sigma and Nikon at f/2 DC R2. On the other hand Sigma bokeh becomes worse at larger focus distances as can be seen in its separate evaluation on this page (here above).
Somewhat innovative methods to get nice bokeh
I had this idea below, but I found it has been described by others before. For example here near the bottom.
-
A method for achieving out of focus highlights (bokeh) with
soft edges:
During image exposure the aperture does not stay constant (does not matter if it is being closed or opened for static subjects; for dynamic subjects it may be interesting to experiment with direction). Outer areas of bokeh will be less exposed thus hard edges of bokeh will be softened. - Since all current DSLRs can close aperture from fully open to specified more closed position really quickly in between focusing mode and exposure mode, this aperture movement can probably reach enough speed to be useable for exposure speeds in practical photography. For example: Some cameras have aperture controlled by lever (Nikon F mount lenses). Nikon DSLR cameras differ in whether they allow to change aperture in video and live view modes, probably because they are limited by lever mechanism. It is quite likely a implementation of this method this could be done as firmware change on most cameras. Too bad, some companies do not allow that level of camera customization yet. Nikon DSLR does not allow this yet (but they will eventually be forced by market in which programmable cameras carry significant competitive advantage, see Worst of Nikon). Canon is better as there is customized firmware available and Canon tolerates it. In fact it is a best thing that happened to Canon.
- For slow exposures in terms of seconds, this method can be achieved manually. On older lenses with aperture ring, you can adjust it during exposure. On newer lenses without aperture ring but with mechanical aperture coupling (Nikon F mount) it can be done when freelensing by using aperture lever.
-
For static scenes and tripod use: Even if you cannot adjust
aperture in continuous way during exposure like proposed
above, you can bracket aperture and merge resulting
exposures. Sample vizualization:

It works better with lenses that do not have edgy bokeh though. - Some lenses or cameras with lens use leaf shutters, but those are not same and they do not maintain circular or similar shape when closing. Example Fuji X100(s) has leaf shutter: slow motion video of X100S shutter
- Some cameras use diaphragm as shutter. http://en.wikipedia.org/wiki/Shutter_%28photography%29#Diaphragm_shutter they however consider effect on bokeh and apparent depth of field as a bad side effect rather than a virtue. They also fully close apperture while my method may for example for a f/1.8 lens use apertures in range between f/1.8 to f/2.5, but not more closed so that there is no bright center point in bokeh while exposure time is controlled by focal plane or electronic shutter.
Effect of Electronic First Curtain Shutter (EFCS) on Bokeh
Many cameras that have live view mode use or have option to use Electronic First Curtain Shutter (EFCS) mode. In mechanical shutter mode, there are two shutter curtains. For slow shutter speeds: the first opens, then exposure happens, the second closes (movement in same direction). But for shutter speeds faster than around 1/200s, the speed of curtain is not fast enough so what happens is that even before the first curtain is fully openned the second curtain starts already closing. For fast shutter speeds there is only a small slit between curtains moving over the sensor. EFCS solves problem with liveview where to start exposure with full manual shutter the shutter needs to close first (it was open for live view). That additional movement makes shutter less responsive to user input and also shakes camera more before exposure starts. EFCS replaces the first curtain by electronic sensor row reset. For fast shutter speeds this also forms a slit moving over sensor.
This is just a lens that projects bright point in the scene
(right side) towards camera (left side, camera not present
yet): 
Now add a sensor to the camera side that is at location where
rays are not converging, i.e. where light source is not
focused:

Notice how bottom part and top part of the bokeh
ball is caused by rays that do not approach sensor
perpendicularly.
Last image shows what happens to the exposure when one curtain
is directly at the sensor and the other is in front of it. The
effect is highest when slit is smallest (highest shutter
speed). It shows that exposure is affected by light direction.

External Links
Some articles that go deeper into character of bokeh than just tell the rules for size of bokeh:
- Excellent pictures and discussions related to bokeh in Fred Miranda forums. Warning: there is over 130 pages and you may spend several hours browsing them. Go to starting page or to lens index made for first 113 pages.
- Neil van Niekerk site is very useful for photographers to learn tricks with flash that are useful for wedding and event photography. He also has nice article about bokeh: http://neilvn.com/tangents/2010/10/26/bokeh-a-few-notes/. Other bokeh related articles: http://neilvn.com/tangents/2011/03/30/photo-session-jessica-b-various-85mm-lenses/ Bokeh Comparisons of Nikon 35/1.4g vs. Sony RX1 with fixed 35/2: http://neilvn.com/tangents/bokeh-sony-rx1-vs-nikon-35mmm-f1-4g/
- Ken Rockwell has fairly good article on bokeh: http://www.kenrockwell.com/tech/bokeh.htm And also a comparison of background bokeh of various lenses: http://www.kenrockwell.com/nikon/bokeh-comparison.htm
- Paul van Walree has excellent articles on optics used in photographic lenses. This one is about bokeh: http://toothwalker.org/optics/bokeh.html
- Markus Keinath has a lot of great bokeh related pages: Adding an Apodization filter to a lens. Using a lens with close range correction as defocus control and modifying it to have even better DC range. Pictures with a lens that has significant over-correction of spheric aberration.
- Klaus Shuler page about bokeh is excellent: http://bokehtests.com/styled/index.html
-
Marianne Oelund has a page about her's optical simluator. At the botom, there is a nice picture showing how Spherical Aberration (SA) makes bokeh creamy in background, edgy in foreground and how it shifts focus:
http://actionphotosbymarianne.com/tech/Optsim/index.html
She writes "The profile of the blur circles determines the quality of bokeh. Lenses with undercorrected SA such as this one, produce smooth background bokeh due to the very gradual fade-out of the blur circle toward its perimeter. In contrast, foreground bokeh becomes harsh because so much light is concentrated at the perimeter of the blur circles. You can see that this harshness, and the focus shift accompanying SA, is reduced at narrower apertures."
Marianne also started this DPReview thread full of bokeh tests of various lenses - Zeiss has very in depth article about DoF and bokeh: http://www.zeiss.com/c12567a8003b8b6f/embedtitelintern/cln_35_bokeh_en/$file/cln35_bokeh_en.pdf
- Viktor Pavlovič has large comparison of potrait lenses (including Nikon 105DC and various manual lenses) on target that allows you to compare bokeh: http://verybiglobo.blogspot.cz/2013/11/portrait-lens-which-one-21-30.html. He has also sharpness and bokeh tests of Sony 135 STF: http://verybiglobo.blogspot.cz/2013/08/sony-sal-135-f28-t45-stf.html. A battle of bokeh of 35mm lenses: http://verybiglobo.blogspot.cz/2013/02/which-35mm-lens-is-best-battle-of-35mm.html.
Back to index - Jakub Trávník's resources.